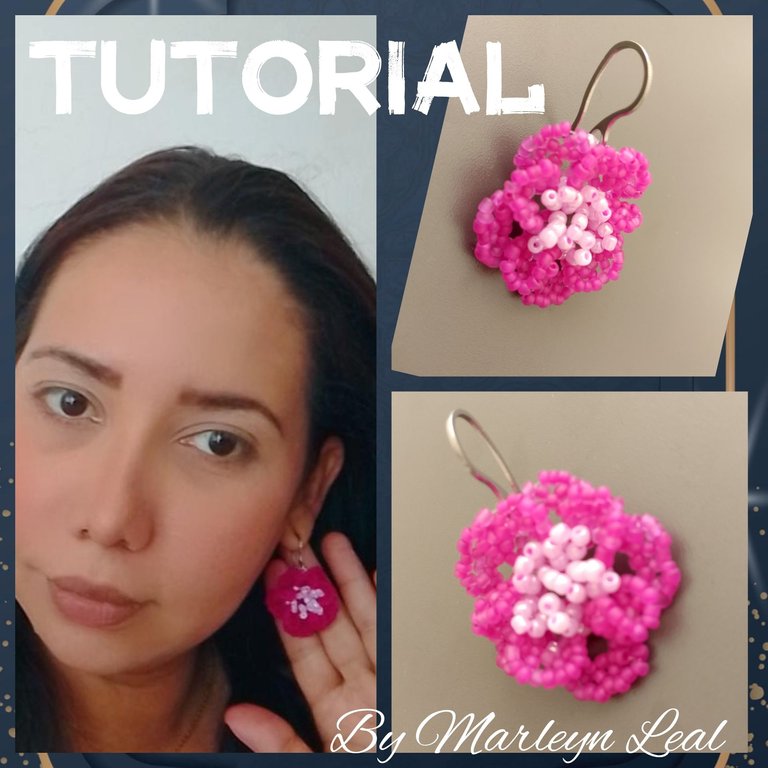
Feliz y bendecido nuevo día, espero estén bien, felices, sanos, llenos de energía positiva, brillando, creciendo y sobre todo siendo casa día su mejor versión. Hoy vamos a realizar unos delicados Zarcillos que se asemejan a una rosa con motivo del concurso de primavera! Es un zarcillo algo elaborado aunque repetitivo, lo explícate a través de una secuencia de imágenes explicadas paso a paso. Estás rosas son perfectas para un outfit casual, preferiblemente con un cuello ancho, hombros descubiertos.
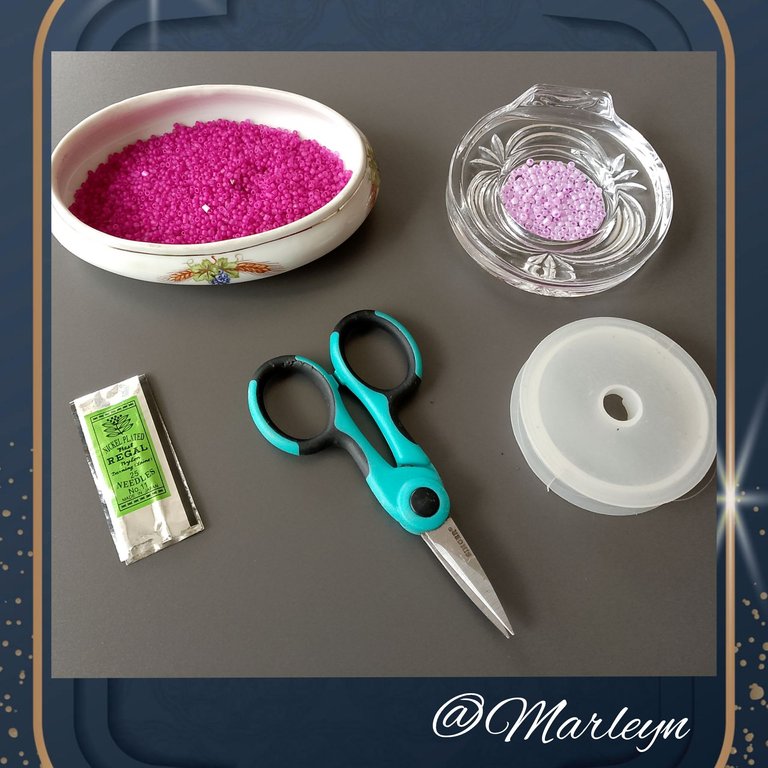
Materiales: Mostacillas fucsia #11, Mostacillas moradas #11, hilo nailon 0,20 milímetros, aguja para Mostacillas, tijera, anzuelo para zarcillos o base para zarcillos, ánimo, paciencia y por sobre todo, ganas de aprender!
Materials: Fuchsia beads #11, purple beads #11, nylon thread 0.20 millimeters, beading needle, scissors, tendril hook or tendril base, courage, patience and above all, willingness to learn!
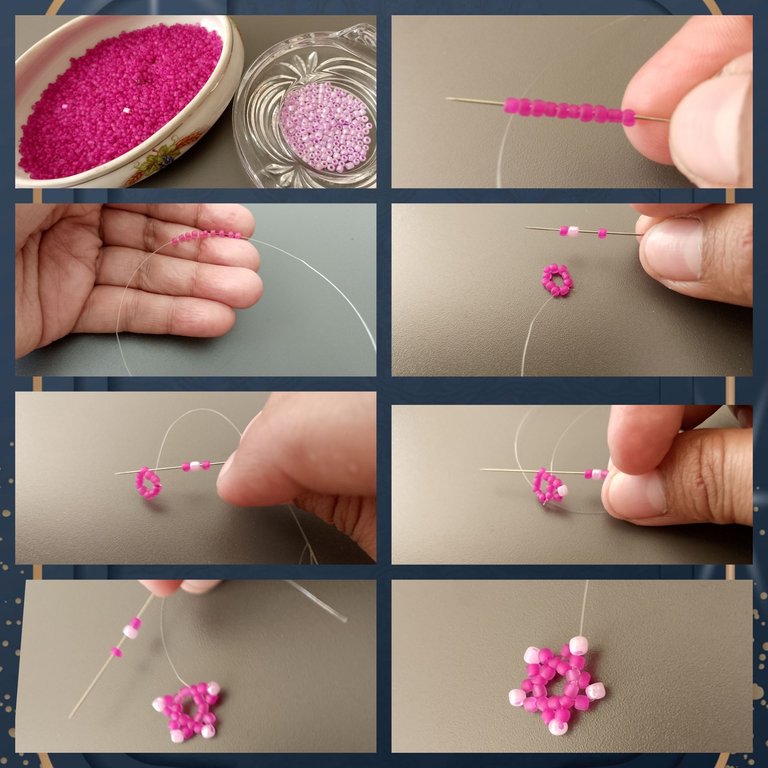
Paso 1: Vamos a comenzar, crearemos una hermosa flor tipo rosa, para empezar ensarta el nailon en la aguja, introduce 10 Mostacillas fucsias en la aguja, llévalo al final del.hilo y realizamos un nudo sencillo, seguido de un do doble, para la aguja a la siguiente Mostacilla, ahora introduce 1 Mostacilla fucsia, 1 mostacilla morada, y otra mostacilla fucsia, deja una mostacilla de por medio, es decir, introduce la aguja en la tercera mostacilla, continua de es manera formando esas puntas que ves en la imagen, parece que formas una estrella! Al llegar al final sube el hilo por la morada hasta arriba!
Step 1: Let's get started, we will create a beautiful rose type flower, to start thread the nylon onto the needle, insert 10 fuchsia Moustachins onto the needle, bring it to the end of the. Now introduce 1 fuchsia mustard, 1 purple mustard, and another fuchsia mustard, leave a mustard in between, that is, introduce the needle in the third mustard, continue in this way forming those points that you see in the image, it seems that you form a star! When you reach the end, bring the thread up through the purple one to the top!
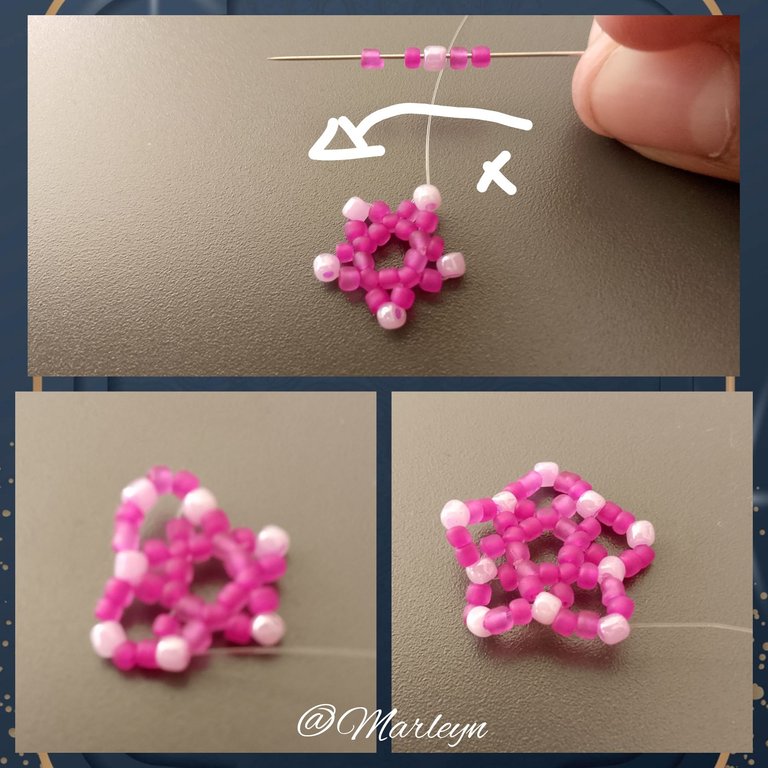
Ahora introduce en la aguja 2 mostacillas fucsias, 1 Mostacilla morada y 2 fucsia y la.pasaremos de la mostacilla morada a la siguiente Mostacilla morada, asi consecutivamente hasta terminar y llegar nuevamente donde empezamos, subiendo el hilo a la siguiente Mostacilla morada de la que se empezó, como te muestro en las imágenes.
Now introduce in the needle 2 fuchsia beads, 1 purple bead and 2 fuchsia beads and pass it from the purple bead to the next purple bead, so consecutively until finishing and arriving again where we started, raising the thread to the next purple bead from which it started, as I show you in the pictures.
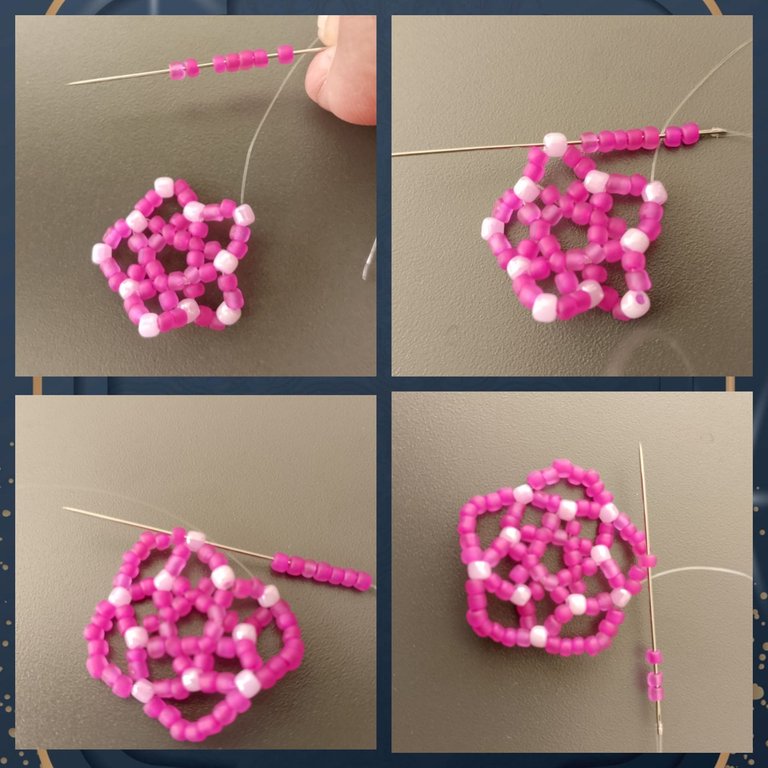
Ahora vamos a usar solo mostacillas fucsias, inserta 7 mostacillas fucsias y pasa la aguja por la próxima mostacilla morada, así consecutivamente hasta llegar a la mostacilla morada donde empezamos! Ahora introduce la aguja a la siguiente Mostacilla fucsia y la sacamos allí para dejarla lista para el próximo paso!
Now we are going to use only fuchsia beads, insert 7 fuchsia beads and pass the needle through the next purple bead, so consecutively until we get to the purple bead where we started! Now insert the needle into the next fuchsia bead and pull it out to leave it ready for the next step!
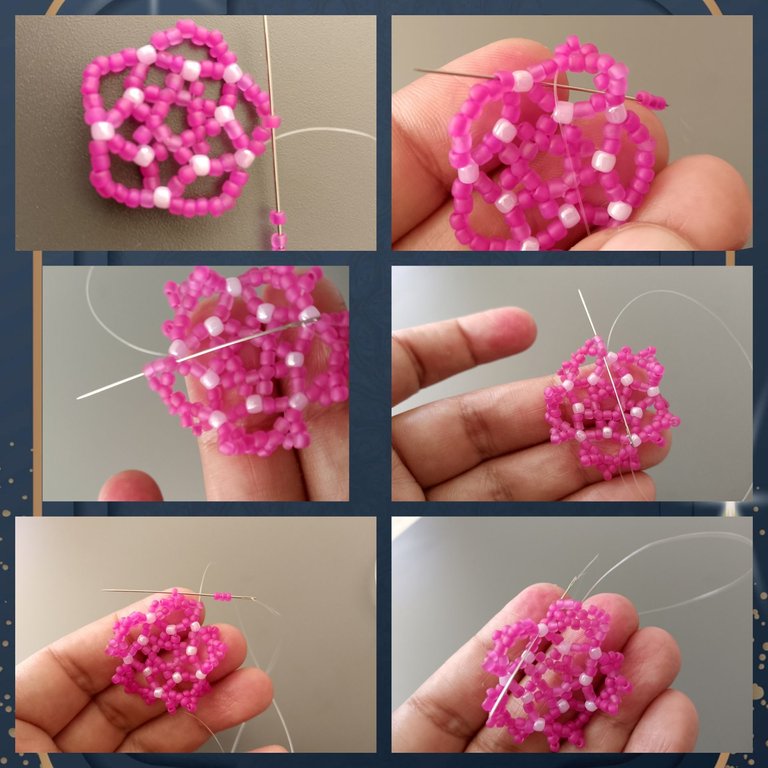
Vamos a formar los primeros pétalos, introduce 3 mostacillas fucsias en la aguja, deja una de intermedio e introduce la aguja por la tercera mostacilla, vuelve a introducir 3 mostacillas en la aguja y deja otra vez una mostacilla de intermedio por cada pétalos haremos 3 picos! Ahora sacamos la aguja por la Mostacilla morada y la subimos a la siguiente fucsia para repetir el proceso que acabamos de hacer, y así consecutivamente hasta llegar al principio!
We are going to form the first petals, introduce 3 fuchsia beads in the needle, leave one in between and introduce the needle through the third bead, introduce again 3 beads in the needle and leave again one bead in between for each petal we will make 3 peaks! Now we take out the needle through the purple bead and bring it up to the next fuchsia to repeat the process we just did, and so on until we get to the beginning!
Ahora para terminar estos pétalos, subimos 3 mostacillas para llegar a la punta de el primer picó que hicimos en el paso anterior ahora introduce 3 mostacillas y vas a introducir la aguja en el siguiente picó, vuelve a introducir 3 mostacillas y pasa la aguja para el otro picó, ahora bajamos la aguja y la pasamos por la morada, sigue 3 mostacillas hasta el proximo picó y asi consecutivamente hasta llegar al principio te quedará como ves en las imágenes.
Now to finish these petals, we raise 3 beads to get to the tip of the first picó that we did in the previous step now introduce 3 beads and you will introduce the needle in the next picó, reintroduce 3 beads and pass the needle to the other picó, now we lower the needle and pass it through the purple, follow 3 beads to the next picó and so on consecutively until you get to the beginning you will be as you see in the pictures.
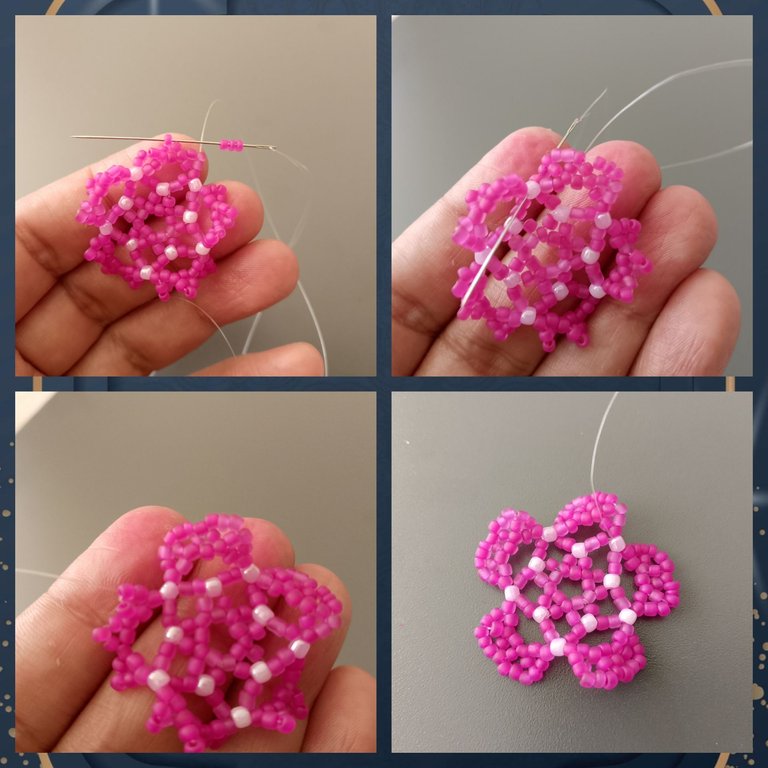
Vamos a bajar la aguja a la Mostacilla morada central como te muestro en la imagen para hacer nuevos pétalos, vamos a introducir 7 mostacillas fucsias y la pasas a la siguiente Mostacilla morada, sigue asi hasta formar los nuevos pétalos.
We are going to lower the needle to the central purple bead as shown in the image to make new petals, we are going to introduce 7 fuchsia beads and pass it to the next purple bead, continue in this way until the new petals are formed.
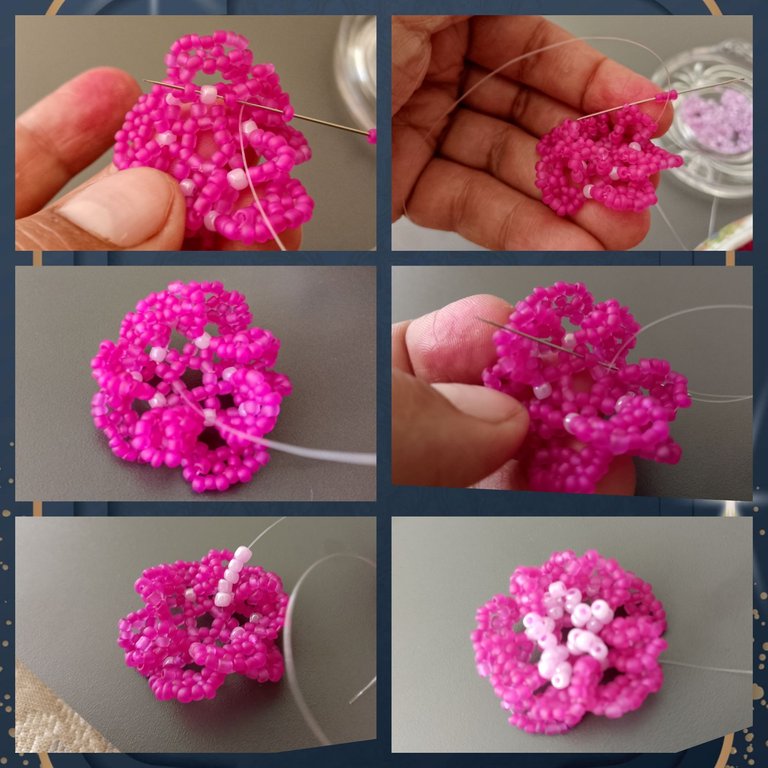
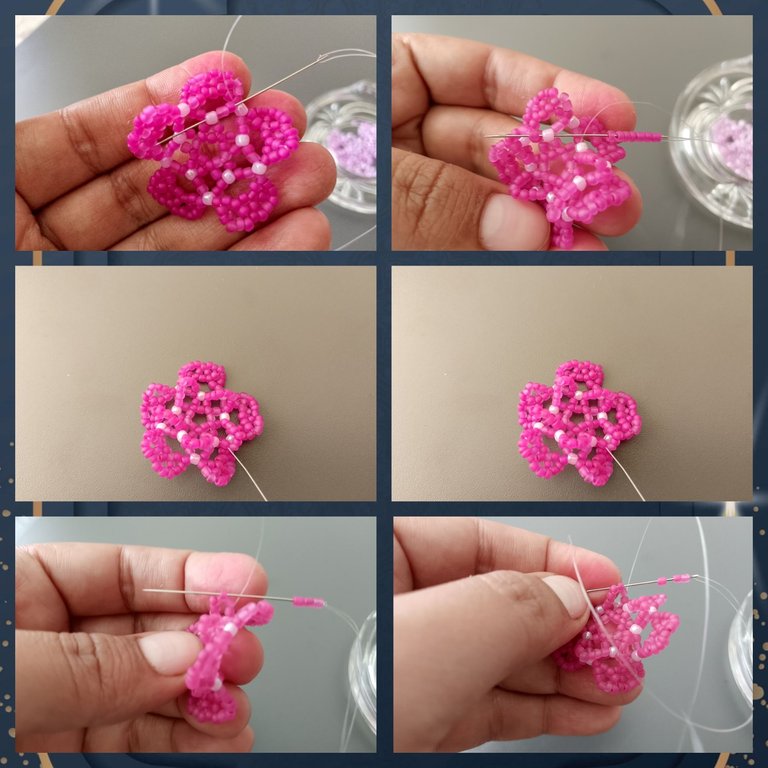
Ahora realizamos el mismo proceso anterior para crear todos los pétalos, en este igual formaremos 3 picos en cada pétalos, para luego cerrarlos, de allí pasaremos a una mostacilla central de las fucsia y vamos a colocar 5 mostacillas moradas, dejamos una mostacilla de oir medio y volvemos a introducir la.aguja repitiendo el.proceso para crear el centro de nuestra bella flor.
Now we make the same process to create all the petals, in this same process we will form 3 peaks in each petal, and then close them, from there we will pass to a central bead of fuchsia and we will place 5 purple beads, we leave a bead in the middle and we reintroduce the needle repeating the process to create the center of our beautiful flower.
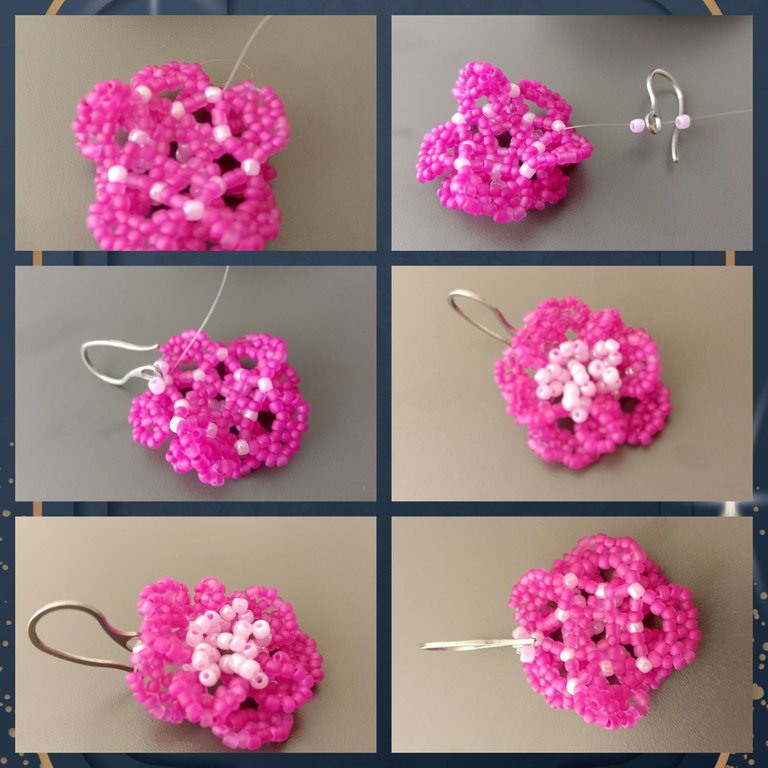
Continua ahora con la aguja hacia arriba y colocamos una Mostacilla morada introduce el anzuelo para zarcillos, y nuevamente otra mostacilla morada! Dale varias vueltas y ve amarrando para que no se suelte! De este manera hemos terminado una pieza hermosa, diferente y facil de hacer! Puedes jugar con los colores y para que sea más visible y sea más relevante la pieza puedes colocar las mostacillas de la parte de arriba de un color diferente así se notará mucho mas la forma de rosa!
Se que queda muy pocas horas para finalizar el concurso, aún así invito a participar no solo en este concurso si no activamente en esta comunidad tan grandiosa a todos y a @migda, @lauramica, @axlcarlos aprenderan y tendrán una ventana abierta a amistades increíbles.
Continue now with the needle upwards and place a purple bead, insert the tendril hook, and again another purple bead! Turn it several times and tie it so that it doesn't come loose! In this way we have finished a beautiful, different and easy to make piece! You can play with the colors and to make the piece more visible and relevant you can place the beads on the top of the piece in a different color so the rose shape will be much more noticeable!
I know that there are only a few hours left to finish the contest, but I invite you to participate not only in this contest but also actively in this great community and to @migda, @lauramica, @axlcarlos you will learn and have an open window to incredible friendships.


IMAGENES CREADAS EN CANVA
IMAGES CREATED IN CANVA


