[EN]
One of the battle rules I hate the most in Splinterlands is Going to the Distance. I'm not a big fan of ranged cards because they are unable to attack in the first position (except for those with the Close Range ability), but since I have to adapt to all the battle rules in the game, I try to develop new strategies for this rule.
In this post, I'll show you one of the strategies I use the most in the Going to the Distance rule when the amount of mana available is low.
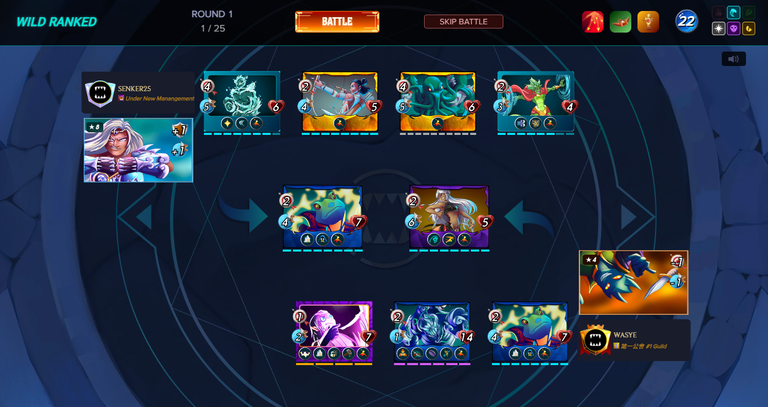
For those who don't know this rule, it is represented by the image above and its function is to make players only able to use monsters with ranged attacks in battle.
Although I'm not a big fan, I like to use monsters with ranged attacks in my battles since most of them have a powerful attack or very useful abilities, but they have a big weakness which is not being able to attack in the first position and that's why I don't like the Going the Distance rule, since at some point my monsters can become useless in battle. There is an exception which is the Close Range ability since this ability makes monsters with ranged attacks able to attack in the first position.
Now let's go straight to my strategy, it's very simple but very useful and has already given me many victories.
Watch The Battle
In this battle I use the strategy and as you can see besides the Going the Distance rule there are also the Close Range and Target Practice rules.
In the Close Range rule all monsters gain the Close Range ability and this means that monsters with ranged attacks will be able to attack in the first position.
In the Target Practice rule all monsters gain the Snipe ability.
My strategy is summarized to the Wave Brood monster and healing abilities (Triage). For it to work, I first choose a monster that won't be easily defeated in the first position since, despite the Wave Brood receiving most of the attacks because of its Taunt ability, my opponent's monster in the first position will still attack my monster in the first position, so I selected the Naga Assassin, it is a monster with ranged attack that has a good chance of dodging attacks since it has a large amount of speed, so it is a great choice to defend in the first position (for battles with little mana).
Now that we have the defense in the first position, let's move on to the other monsters. As I mentioned before, the Wave Brood is the main monster in this battle and the reason for this is because it has the Taunt ability that makes it the target of my opponent's monsters, in addition to that, it has the Return Fire ability that makes it deal part of the ranged damage received back to the monster that attacked it.
Even though Wave Brood is a great defense, it is not immortal, so that is why I selected Angelic Mandarin and Scale Doctor for the battle. Both have the Triage ability, which means that each one will heal Wave Brood for 1/3 of its maximum health once per round.
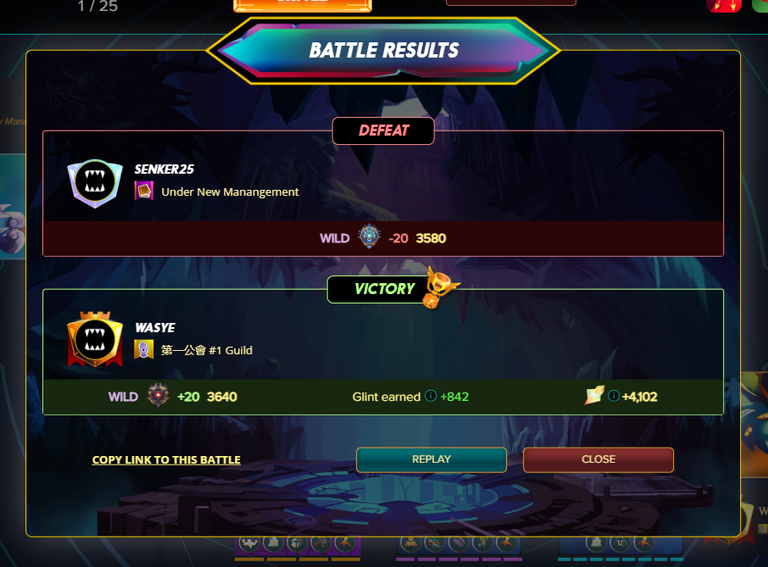
Even though my opponent had more monsters and more attack power, he was unable to do almost anything against my strategy and I was able to beat him easily without losing any of my monsters.

[PT-BR]
Uma das regras de batalha que eu mais odeio em Splinterlands é a Going to the Distance, eu não sou um grande fã de cartas ranged porque elas são incapazes de atacar na primeira posição (com exceção das que possuem a habilidade Close Range), mas como eu tenho que me adaptar a todas as regras de batalha do jogo então tento elaborar novas estratégias para essa regra.
Nesse post vou mostrar uma das estratégias que mais utilizo na regra Going to the Distance quando a quantidade de mana disponível é baixa.
Para aqueles que não conhecem essa regra, ela é representada pela imagem acima e sua função é fazer com que os jogadores sejam capazes de usar apenas monstros com ataque ranged na batalha.
Apesar de não ser um grande fã, eu gosto de usar monstros com ataque ranged em minhas batalhas já que a maioria possui um poderoso ataque ou habilidades muito úteis, mas eles possuem uma grande fraqueza que é não serem capazes de atacar na primeira posição e por isso que eu não gosto da regra Going the Distance, já que em algum momento os meus monstros podem ser tornar inúteis na batalha. Existe uma exceção que é a habilidade Close Range já que essa habilidade faz os monstros com ataque ranged serem capazes de atacar na primeira posição.
Agora vamos direto para a minha estratégia, ela é bem simples mas muito útil e já me rendeu muitas vitórias.
Watch The Battle
Nessa batalha eu utilizo a estratégia e como vocês podem ver além da regra Going the Distance também existe as regras Close Range e Target Practice.
Na regra Close Range todos os monstros ganham a habilidade Close Range e isso significa que os monstros com ataque ranged serão capazes de atacar na primeira posição.
Na regra Target Practice todos os monstros ganham a habilidade Snipe.
Minha estratégia é resumida ao monstro Wave Brood e a habilidades de cura (Triage). Para ela funcionar primeiro eu escolho um monstro que não vai ser derrotado facilmente na primeira posição já que apesar do Wave Brood receber a maioria dos ataques por causa de sua habilidade Taunt, o monstro do meu adversário na primeira posição ainda vai atacar o meu monstro na primeira posição, então eu selecionei a Naga Assassin, ela é um monstro com ataque ranged que possui uma boa chance de se esquivar dos ataques já que possui uma grande quantidade de velocidade então ela é uma ótima escolha para defender na primeira posição (para batalhas com pouca mana).
Agora que temos a defesa na primeira posição vamos para os outros monstros. Como mencionei antes o Wave Brood é o monstro principal nessa batalha e o motivo disso é porque ele possui a habilidade Taunt que faz ele ser o alvo dos monstros do meu adversário, além disso ele possui a habilidade Return Fire que faz ele causar parte do dano ranged recebido de volta para o monstro que o atacou.
Apesar do Wave Brood ser uma grande defesa ele não é imortal então é por isso que eu selecionei o Angelic Mandarin e o Scale Doctor para a batalha, ambos possuem a habilidade Triage e isso significa que cada um vai curar o Wave Brood em 1/3 da sua vida máxima 1x por round.
Mesmo meu adversário possuindo mais monstros e mais poder de ataque, ele não foi capaz de fazer quase nada contra a minha estratégia e eu conseguir vencer ele facilmente sem perder nenhum dos meus monstros.
Posted Using INLEO