
Saludos Hivers, en especial al amigo @ecoinstant por su apoyo incondicional. Cabe nombrar que hasta ayer le entregué una propuesta para aplicar Typescript a la librería @nectarflower, pero eso sera cosa de otro post.
sin embargo mira un poco mas aqui
English Version at very bottom!!!
Link al repositorio principal >> aqui << 
Tutoriales Hive - Reactjs
Por acá les traigo un tutorial cargado de muchas cosas pero que trata de mostrar el codigo de como conectarse a los nodos RPC, usando la librería DHive desde react. y por supuesto usando Typescript.
te sugiero que sigas desde el post anterior porque necesitas lo minimo para configurar tu app. Yo supondre que ya sabes cargar lo basico y este tutorial parte alli.
Importante: tambien supongo que sabes lo basico de vite, reactjs y typescript. Siempre que lo necesites te aconsejo hacer tutoriales, por ejemplo de Dave Gray o del amigo Jack
DHive como herramienta potente robusta y adecuada
@hiveio/dhive es la biblioteca estándar y esencial para desarrolladores que construyen aplicaciones en la blockchain de Hive usando JavaScript o TypeScript. Simplifica drásticamente la interacción con la red, permitiendo conectar a nodos, consultar datos públicos (posts, usuarios, bloques) y construir transacciones. Es el puente fundamental que facilita la creación de interfaces web, aplicaciones de servidor o herramientas que se comunican directamente con Hive. Dominar @hiveio/dhive es un paso clave para desarrollar con éxito en este ecosistema dinámico.
Paso 1
Tener la app ya lista y probada para correr usando vite, react y typescript. Procedemos a instalar dhive desde npm:
npm i @hiveio/dhive
esta libreria permite su uso tanto en browser como en nodejs
- Vamos a modificar el App.tsx asi:
// src/App.tsx
import React, { useEffect, useState } from 'react';
// Importamos solo lo necesario
import { Client, SignedBlock } from '@hiveio/dhive';

// >>> COMENTARIO IMPORTANTE: Configura el cliente de dhive.
// Conecta a un nodo API público de Hive.
const client = new Client('https://api.hive.blog');

// Definimos un tipo para el bloque que esperamos, incluyendo el número
interface SimpleBlockInfo extends SignedBlock {
    block_number: number;
}

function App() {
  // >>> COMENTARIO IMPORTANTE: Estado simple para guardar el último bloque
  const [latestBlock, setLatestBlock] = useState<SimpleBlockInfo | null>(null);

  // >>> COMENTARIO IMPORTANTE: useEffect para ejecutar la lógica al montar el componente
  useEffect(() => {
    // Función asíncrona para obtener y mostrar el último bloque
    async function fetchAndDisplayLatestBlock() {
      try {
        // 1. Obtener propiedades globales para el número del último bloque
        const props = await client.database.getDynamicGlobalProperties();
        const headBlockNumber = props.head_block_number;

        // 2. Obtener los detalles completos del bloque
        const blockDetails = await client.database.getBlock(headBlockNumber) as SignedBlock | null;

        // 3. Si se obtienen los detalles, guardarlos y mostrarlos
        if (blockDetails) {
            const blockWithNumber: SimpleBlockInfo = {
                 ...blockDetails,
                 block_number: headBlockNumber
            };
            // >>> Mostrar en consola
            console.log('Último Bloque Obtenido (Consola):', blockWithNumber);
            // >>> Guardar en estado para renderizar
            setLatestBlock(blockWithNumber);
        } else {
             console.error(`No se pudieron obtener los detalles del bloque ${headBlockNumber}.`);
        }

      } catch (err: any) {
        console.error('Error fetching latest block:', err);
      }
    }

    fetchAndDisplayLatestBlock(); // Ejecuta la función
  }, []);

  return (
    <div>
      <h1>Conexión Básica a Hive</h1>

      {latestBlock ? (
        <div>
          <p>Último bloque cargado:</p>
          <p>Número: {latestBlock.block_number}</p>
          <p>Tiempo: {new Date(latestBlock.timestamp + 'Z').toLocaleString()}</p>
          {/* Puedes añadir más campos si quieres: <p>Transacciones: {latestBlock.transactions.length}</p> */}
        </div>
      ) : (
        // Mensaje mientras se carga o si falla (simple)
        <p>Cargando último bloque o error...</p>
      )}
    </div>
  );
}

export default App;
probable que tengas un error y es por que debemos instalar los tipos para node:
npm install --save-dev @types/node
Nota super importante y cuidandome de los desarroladores de HIVE: al ser un tutorial destinado a usuarios basicos de react y hive, he dejado muchos comentarios en el codigo. Esto es una practica meramente educativa. Yo siempre recomiendo que el codigo debe hablar o explicarse a si mismo y que los comentarios deben ser, en lo posible, evitados para codigo de produccion
- Habiendo hecho eso podemos correr y te sugiero agregar una instruccion a tu archivo
package.jsoncomo:"dev": "npx vite"asi tu archivo se veria asi luego de editarlo o parecido a:
{
  "name": "02-intro-hive-react",
  "version": "1.0.0",
  "main": "index.js",
  "scripts": {
    "test": "echo \"Error: no test specified\" && exit 1",
    "dev": "npx vite"
  },
  "keywords": [],
  "author": "",
  "license": "ISC",
  "description": "",
  "dependencies": {
    "@hiveio/dhive": "^1.3.2",
    "axios": "^1.9.0",
    "react": "^19.1.0",
    "react-dom": "^19.1.0"
  },
  "devDependencies": {
    "@types/node": "^22.15.3",
    "@types/react": "^19.1.2",
    "@types/react-dom": "^19.1.3",
    "typescript": "^5.8.3",
    "vite": "^6.3.4"
  }
}
- De esta manera no tienes que tipear
npx vitesinonpm run devy te servira para ir sentando bases en tu futuro como programador. - Si modificaste como te sugeri, entonces ejecuta
npm run deven tu consola de VSCode o el comando que tengas. Y deberi ver la app, muy simple sin estilos ni nada, mostrando la informacion del ultimo bloque. Si actualizas la pagina, veras que carga el ultimo bloque.
Hive Blockchain tips
Esta cadena de bloques, genera un nuevo bloque cada 3 segundos. En dichos bloques, se imprime informacion, operaciones y transacciones que se dan.
Ejemplo: tu ejecutas un voto y ese voto se transmite a la red y sera impreso en la cadena de bloques usando una serie de mecanismos. Alli es donde entran en juego los testigos.
Compliquemos un poco las cosas
Aprovechando que tenemos la libreria dhive, podemos interactuar directamente con la cadena de bloques. Asi que pidamos las propiedades globales de HIVE. Hagamos uso de un efecto de react para programar la peticion:
useEffect(() => {
    async function fetchGlobalProperties() {
      try {
        setLoading(true);
        setError(null);
        const props = await client.database.getDynamicGlobalProperties();
        setGlobalProps(props);
        console.log('Propiedades Globales (desde App):', props);
      } catch (err: any) {
        console.error('Error fetching global properties (App):', err);
        setError(`Error al conectar o obtener datos iniciales: ${err.message}`);
        setGlobalProps(null);
      } finally {
        setLoading(false);
      }
    }
    fetchGlobalProperties();
  }, []);
- Este effecto lo colocamos en nuestro codigo de react(antes del render) y al hacerlo errores aparecen indicando que necesitamos definir esos estados.
- Asi que coloquemos las definiciones antes de llamar al efecto:
const [globalProps, setGlobalProps] = useState<any>(null);
const [loading, setLoading] = useState<boolean>(true);
const [error, setError] = useState<string | null>(null);
- y en nuestro render coloquemos:
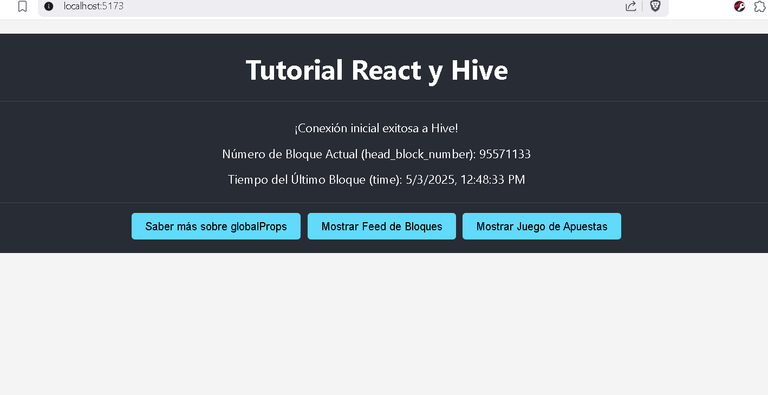
<h1>Tutorial React y Hive</h1>

        {/* Mostrar estado de carga, error o datos iniciales de GlobalProps */}
        {loading && <p>Cargando propiedades globales iniciales...</p>}
        {error && <p className="error-message">{error}</p>}

        {!loading && !error && globalProps && (
          <div>
            <p>¡Conexión inicial exitosa a Hive!</p>
            <p>Número de Bloque Actual (head_block_number): {globalProps.head_block_number}</p>
            <p>Tiempo del Último Bloque (time): {new Date(globalProps.time + 'Z').toLocaleString()}</p>
          </div>
        )}
- Si miramos la consola del navegador, veremos un log con las propiedades globales que son vitales como parametros para el debido funcionamiento de HIVE. Y deberiamos ver el bloque actual en pantalla.
Que tanto puedo hacer con dhive:
- Consultar la cadena de bloques, operaciones y demas en tiempo real.
- Obtener informacion detallada de transacciones y cuentas
Como desarrolladores podemos espiar un sitio web. Abre la consola de desarrollo mientras tiene abierta la pagina de peakd y busca la pestana "Network" y refresca la pagina.
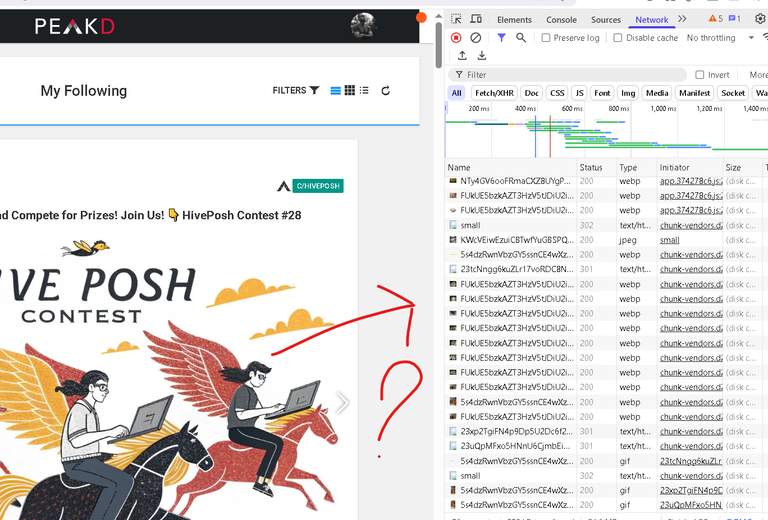
Que son todas esas "peticiones"? Es data y peticiones de red que peakd accesa. Busca alguna que diga "api.hive.blog" y veras algo como:
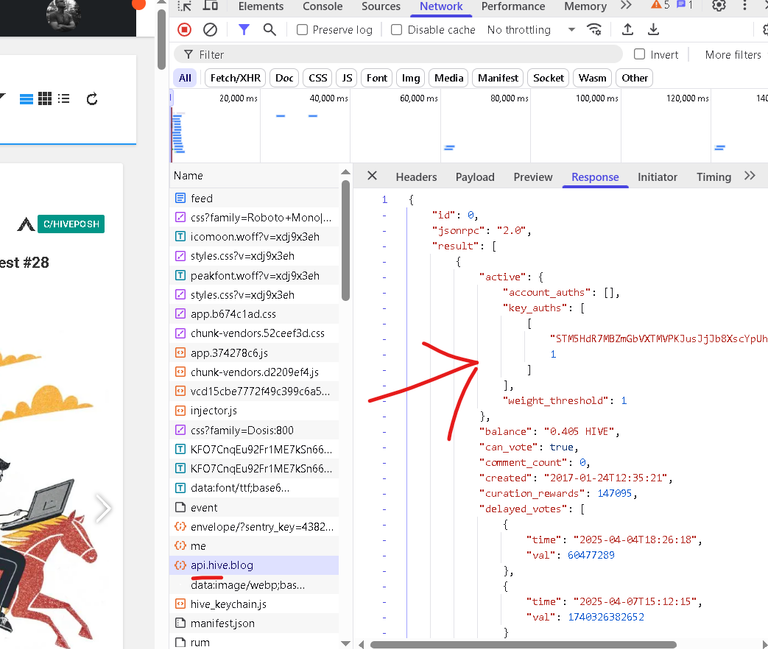
Eso mismo es lo que realiza dhive internamente consulta a api de HIVE usando el nodo RPC
Que mas incluiste en el tutorial que me haga retarme?
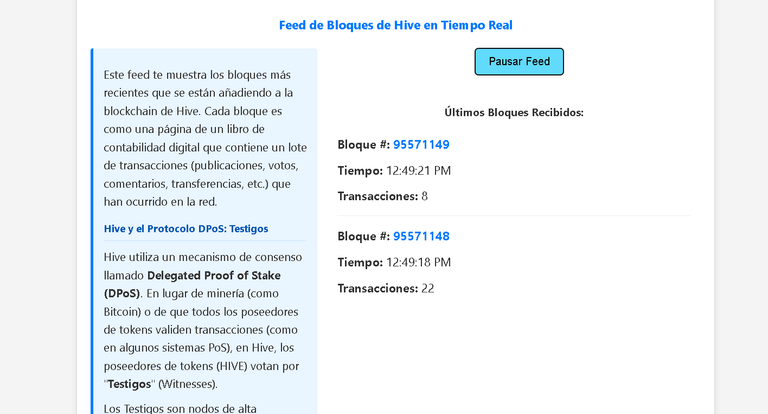
- Un "live blocks feed"
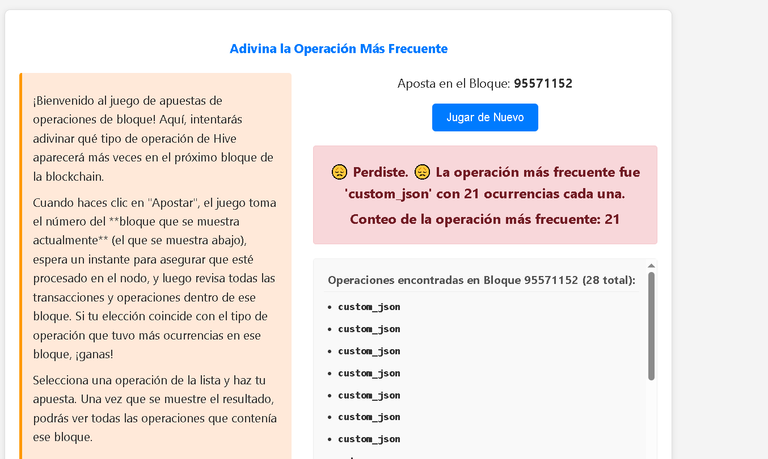
- Un mini juego de apuestas de bloques
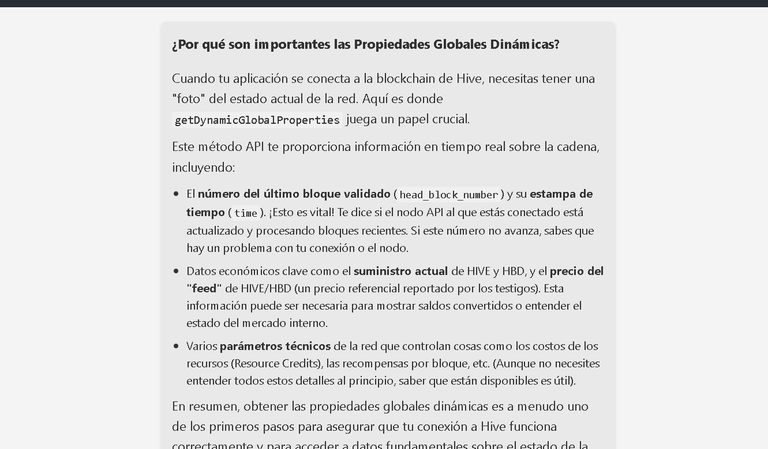
- Documentacion e informacion importante
Aca les dejo una pequeña funcion interesante:
useEffect(() => {
    let intervalId: NodeJS.Timeout | undefined;

    if (isFetchingActive) {
      setError(null);

      if(latestBlocks.length === 0) {
          setLoading(true);
      }

      intervalId = setInterval(async () => {
        try {
          const props = await client.database.getDynamicGlobalProperties();
          const currentHeadBlock = props.head_block_number;
          const lastDisplayedBlockNumber = latestBlocks[0]?.block_number || 0;

          if (currentHeadBlock > lastDisplayedBlockNumber) {
            const block = await client.database.getBlock(currentHeadBlock);

            if (block) {
                const blockWithNumber: DisplayBlockInfo = {
                    ...block,
                    block_number: currentHeadBlock
                };

                setLatestBlocks(prevBlocks => {
                    const newBlocks = [blockWithNumber, ...prevBlocks];
                    return newBlocks.slice(0, 10);
                });
                setError(null);
            } else {
                 console.warn(`Block ${currentHeadBlock} not found yet on API.`);
            }
          }

        } catch (err: any) {
          console.error("Error fetching block:", err);
          setError(`Error al obtener bloque: ${err.message}`);
        } finally {
            setLoading(false);
        }
      }, 3000); // Polling cada 3 segundos
    }

    return () => {
      if (intervalId) {
        clearInterval(intervalId);
      }
    };
  }, [isFetchingActive]); // Dependencia: isFetchingActive
Si el feed está activo, esta rutina revisa Hive cada 3 segundos para ver si hay un bloque nuevo y agregarlo a la lista visible.
Gracias por visitar el tutorial y no dudes en preguntar/comentar si tienes dudas o necesitas guia.
@theghost1980
Send me some love using the link in the image bellow:
Mándame algo de amor usando el enlace en la imagen de abajo:

English Version Here-click
Greetings Hivers, especially to friend @ecoinstant for his unconditional support. It is worth mentioning that until yesterday I gave him a proposal to apply Typescript to the @nectarflower library, but that will be expanded in another post.
however look a little more here
Hive Tutorials - Reactjs
Here I bring you a tutorial loaded with many things but that tries to show the code on how to connect to the RPC nodes, using the DHive library from react. and of course using Typescript.
I suggest you continue from the previous post because you need the minimum to configure your app. I will assume that you already know how to load the basics and this tutorial starts there.
Important: I also suppose you know the basics of vite, reactjs and typescript. Whenever you need it, I advise you to make tutorials, for example from Dave Gray or from your friend Jack
DHive as a powerful, robust and suitable tool
@hiveio/dhive is the standard and essential library for developers building applications on the Hive blockchain using JavaScript or TypeScript. It drastically simplifies interaction with the network, allowing you to connect nodes, consult public data (posts, users, blocks) and build transactions. It is the fundamental bridge that facilitates the creation of web interfaces, server applications or tools that communicate directly with Hive. Mastering @hiveio/dhive is a key step to successfully developing in this dynamic ecosystem.
Step 1
Have the app ready and tested to run using vite, react and typescript. We proceed to install dhive from npm:
npm and @hiveio/dhive
this library allows its use in both browsers and nodejs
- Let's modify App.tsx like this:
// src/App.tsx
import React, {useEffect, useState } from 'react';
//We import only what is necessary
import { Client, SignedBlock } from '@hiveio/dhive';

// >>> IMPORTANT COMMENT: Configure the dhive client.
//Connect to a public Hive API node.
const client = new Client('https://api.hive.blog');

//We define a type for the block we expect, including the number
simpleblockinfo interface extends SignedBlock {
    block_number: number;
}

function App() {
  // >>> IMPORTANT COMMENT: Simple status to save the last block
  const [latestBlock, setLatestBlock] = useState<SimpleBlockInfo | null>(null);

  // >>> IMPORTANT COMMENT: UseEffect to execute logic when mounting the component
  useEffect(() => {
    //Asynchronous function to obtain and display the last block
    async function fetchAndDisplayLatestBlock() {
      try {
        // 1. Get global properties for the number in the last block
        const props = await client.database.getDynamicGlobalProperties();
        const headBlockNumber = props.head_block_number;

        // 2. Get the complete details of the block
        const blockDetails = await client.database.getBlock(headBlockNumber) as SignedBlock | null;

        // 3. If the details are obtained, save and display them
        if (blockDetails) {
            const blockWithNumber: SimpleBlockInfo = {
                 ...blockDetails,
                 block_number: headBlockNumber
            };
            // >>> Show on console
            console.log('Last Obtained Block (Console):', blockWithNumber);
            // >>> Save in state to render
            setLatestBlock(blockWithNumber);
        } else {
             console.error(`The details of the ${headBlockNumber} block could not be obtained.`);
        }

      } catch (err: any) {
        console.error('Error fetching latest block:', err);
      }
    }

    fetchAndDisplayLatestBlock(); // Executes the function
  }, []);

  return (
    <div>
      <h1>Basic Hive Connection</h1>

      {latestBlock ? (
        <div>
          <p>Last loaded block:</p>
          <p>Number: {latestBlock.block_number}</p>
          <p>Time: {new Date(latestBlock.timestamp + 'Z').toLocaleString()}</p>
          {/* You can add more fields if you want: <p>Transactions: {latestBlock.transactions.length}</p> */}
        </div>
      ) : (
        //Message while loading or if it fails (simple)
        <p>Loading last block or error...</p>
      )}
    </div>
  );
}

export default App;
you probably have an error and it is because we must install the types for node:
npm install --save-dev @types/node
Super important note and taking care of the HIVE developers: being a tutorial intended for basic react and hive users, I have left many comments on the code. This is a purely educational practice. I always recommend that the code should speak or explain itself and that comments should be, if possible, avoided for production code
- Having done that we can run and I suggest adding an instruction to your
package.jsonfile such as:"dev": "npx vite"so your file would look like this after editing it or similar to:
{
  "name": "02-intro-hive-react",
  "version": "1.0.0",
  "main": "index.js",
  "scripts": {
    "test": "echo \"Error: no test specified\" && exit 1",
    "dev": "npx vite"
  },
  "keywords": [],
  "author": "",
  "license": "ISC",
  "description": "",
  "dependencies": {
    "@hiveio/dhive": "^1.3.2",
    "axios": "^1.9.0",
    "react": "^19.1.0",
    "react-dom": "^19.1.0"
  },
  "devDependencies": {
    "@types/node": "^22.15.3",
    "@types/react": "^19.1.2",
    "@types/react-dom": "^19.1.3",
    "typescript": "^5.8.3",
    "vite": "^6.3.4"
  }
}
- This way you don't have to type
npx vitebutnpm run devand it will help you lay the foundations for your future as a programmer. - If you modified as I suggested, then run
npm run devin your VSCode console or whatever command you have. And you should see the app, very simple without styles or anything, showing the information of the last block. If you refresh the page, you will see that the last block loads.
Hive Blockchain tips
This blockchain generates a new block every 3 seconds. In these blocks, information, operations and transactions that occur are printed.
Example: you execute a vote and that vote is transmitted to the network and will be printed on the blockchain using a series of mechanisms. That's where witnesses come into play.
Let's complicate things a little
Taking advantage of the fact that we have the dhive library, we can interact directly with the blockchain. So let's order HIVE's global properties. Let's use a react effect to schedule the request:
useEffect(() => {
    async function fetchGlobalProperties() {
      try {
        setLoading(true);
        setError(null);
        const props = await client.database.getDynamicGlobalProperties();
        setGlobalProps(props);
        console.log('Global Properties (from App):', props);
      } catch (err: any) {
        console.error('Error fetching global properties (App):', err);
        setError(`Error connecting or getting initial data: ${err.message}`);
        setGlobalProps(null);
      } finally {
        setLoading(false);
      }
    }
    fetchGlobalProperties();
  }, []);
- We place this effect in our react code (before the render) and when doing so errors appear indicating that we need to define those states.
- So let's put the definitions before calling the effect:
const [globalProps, setGlobalProps] = useState<any>(null);
const [loading, setLoading] = useState<boolean>(true);
const [error, setError] = useState<string | null>(null);
- and in our render let's place:
<h1>React and Hive Tutorial</h1>

        {/* Show GlobalProps loading status, error or initial data */}
        {loading && <p>Loading initial global properties...</p>}
        {error && <p className="error-message">{error}</p>}

        {!loading && !error && globalProps && (
          <div>
            <p>Successful initial connection to Hive!</p>
            <p>Current Block Number (head_block_number): {globalProps.head_block_number}</p>
            <p>Last Block Time (time): {new Date(globalProps.time + 'Z').toLocaleString()}</p>
          </div>
        )}
- If we look at the browser console, we will see a log with the global properties that are vital as parameters for the proper functioning of HIVE. And we should see the current block on the screen.
How much can I do with dhive:
- Consult the blockchain, operations and more in real time.
- Obtain detailed information on transactions and accounts
As developers we can spy on a website. Open the development console while the peakd page is open and look for the "Network" tab and refresh the page.
What are all those "requests"? It is data and network requests that peakd accesses. Look for one that says "api.hive.blog" and you will see something like:
That's what dhive does internally queries the HIVE api using the RPC node
What else did you include in the tutorial that makes me challenge myself?
- A "live blocks feed"
- A mini block betting game
- Documentation and important information
Here I leave you a small interesting function:
useEffect(() => {
    let intervalId: NodeJS.Timeout | undefined;

    if (isFetchingActive) {
      setError(null);

      if(latestBlocks.length === 0) {
          setLoading(true);
      }

      intervalId = setInterval(async() => {
        try {
          const props = await client.database.getDynamicGlobalProperties();
          const currentHeadBlock = props.head_block_number;
          const lastDisplayedBlockNumber = latestBlocks[0]?.block_number || 0;

          if (currentHeadBlock > lastDisplayedBlockNumber) {
            const block = await client.database.getBlock(currentHeadBlock);

            if (block) {
                const blockWithNumber: DisplayBlockInfo = {
                    ...block,
                    block_number: currentHeadBlock
                };

                setLatestBlocks(prevBlocks => {
                    const newBlocks = [blockWithNumber, ...prevBlocks];
                    return newBlocks.slice(0, 10);
                });
                setError(null);
            } else {
                 console.warn(`Block ${currentHeadBlock} not found yet on API.`);
            }
          }

        } catch (err: any) {
          console.error("Error fetching block:", err);
          setError(`Error getting block: ${err.message}`);
        } finally {
            setLoading(false);
        }
      }, 3000); // Polling every 3 seconds
    }

    return () => {
      if (intervalId) {
        clearInterval(intervalId);
      }
    };
  }, [isFetchingActive]); //Dependency: isFetchingActive
If the feed is active, this routine checks Hive every 3 seconds to see if there is a new block and add it to the visible list.