Here I'm back again with my Weekly miniature painting tutorial blog .
Every week I do a miniature painting and write about how easy it is toh paint it . shown step by step .
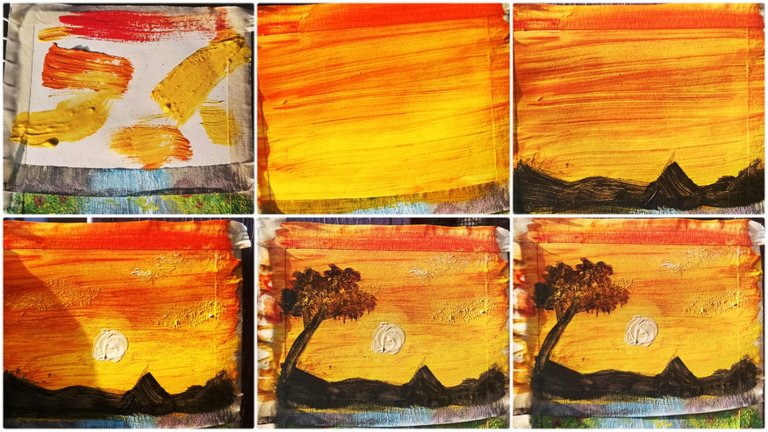
This week I'm painting a Sunset with trees as a silhouette . It's really simple when you follow my techniques .
The materials we need are 4x6 cartridge paper and masking tape to tape the edges down so the painting has a clean white border , we also need some paint brushes for this one I used a dry flat brush and a round brush #3 and a liner brush with another half inch wide flat brush, The paints I'm using are ADX acrylic paints they are very affordable and vibrant so I absolutely love using those .
First step is to securely tape the cartridge paper on a surface I used an old sketchbook to tape it down now this is our mini canvas let's fill it up with our creativity.
I took some tiny amounts off red , yellow and orange color mostly yellow and smeared it on the canvas like so now we take our flat brushe and start crisscross blending the whole canvas so it looks like a orange yellow sunset sky .
Now to add more life to the scene let's add silhouette of hills and mountains at the back with black color because these are just shadows for this I made some triangular wavy shapes randomly over a horizon .
Next we add our sun that is setting down as a white illuminated ball I would blend the edges but so it looks like it's glowing .
Now I add a Tree to the side I made a tree trunk with a flat brush I just made it's branches like the letter "Y" and with a. Dry brush I add more leaf like texture to the tree with same black color .
Dabbing with the dry flat brush is a great way to make foliage texture on your canvas so that's a tip to do it .

Lastly I remove the tape off my canvas and here is the final Piece . I hope you liked it . I absolutely love making these simple miniature scenery paintings they are just joyful to watch and I absolutely think they look cute hanging around .
That's all for today Thank you for your precious time and support ❤️