Guía Paso a Paso para Usar AegisPad: Tu Asistente Inteligente para HIVE
Paso 1: Iniciar Sesión en AegisPad
Para comenzar y asegurar tus configuraciones, necesitarás iniciar sesión con tu cuenta de HIVE. AegisPad utiliza Hive Keychain, la extensión de navegador segura y recomendada para interactuar con la blockchain de HIVE.
- Haz clic en el botón "Login" o "Iniciar Sesión" que usualmente encontrarás en la parte superior derecha de la aplicación.

- Se te pedirá que ingreses tu nombre de usuario de HIVE.
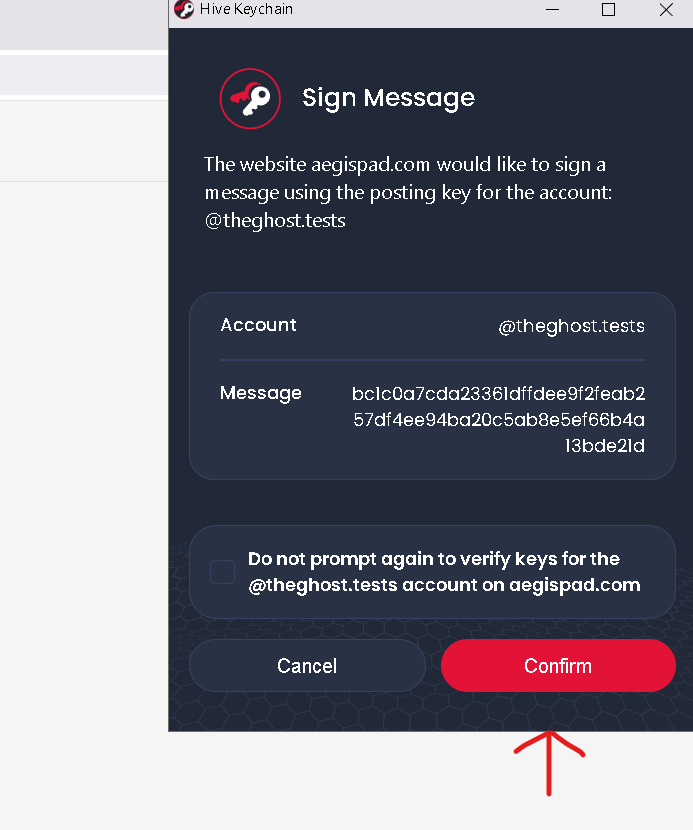
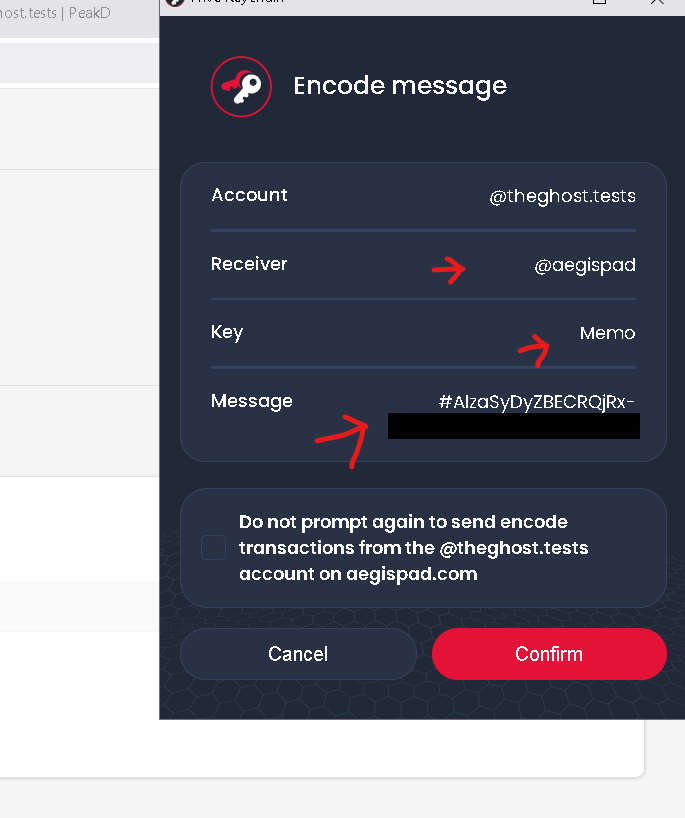
- Hive Keychain se activará y te pedirá autorización para que AegisPad pueda verificar tu identidad. ¡Aprueba la solicitud y listo!
Con esto, AegisPad podrá asociar de forma segura tu clave API de Gemini (que configuraremos más adelante) a tu cuenta.
Paso 2: Obtener tu Clave API de Gemini
Las funciones inteligentes de AegisPad, como la revisión y traducción de textos, son impulsadas por la potente IA de Google, Gemini. Para utilizarlas, necesitarás tu propia clave API de Gemini.
¡Buenas noticias! Google ofrece un nivel gratuito generoso para la API de Gemini, que incluye una gran cantidad de tokens (la "moneda" que se usa para procesar tus solicitudes de IA) cada mes. ¡Esto es más que suficiente para revisar y traducir muchos artículos!
Sigue estos pasos para obtener tu clave:
Visita el sitio web de Google AI Studio.
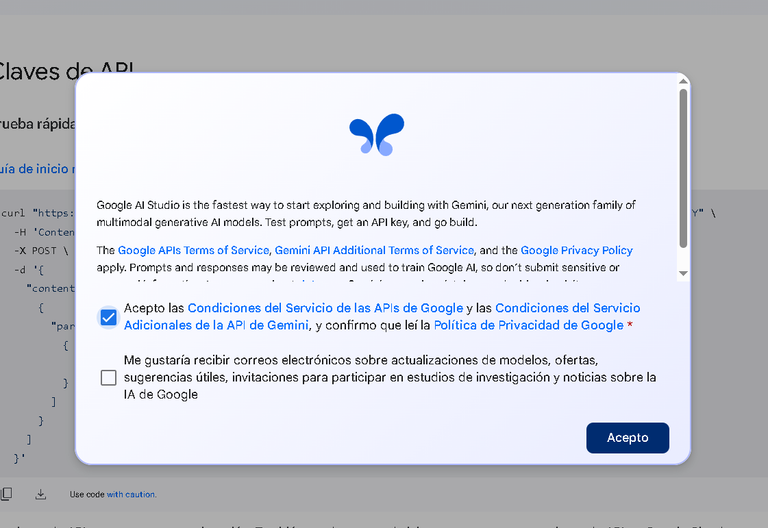
Inicia sesión con tu cuenta de Google.
Busca la opción "Get API key" o "Crear clave API".
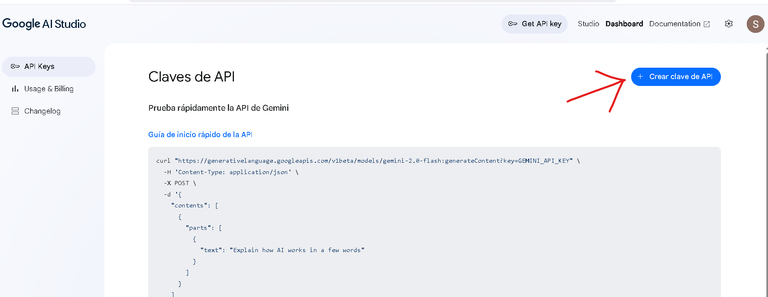
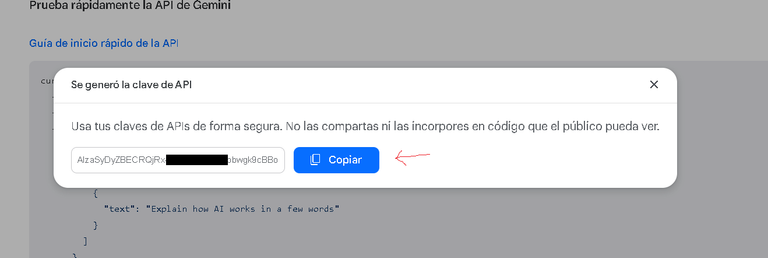
Crea una nueva clave API. Asegúrate de copiarla y guardarla en un lugar seguro temporalmente, ya que la necesitarás en el siguiente paso.
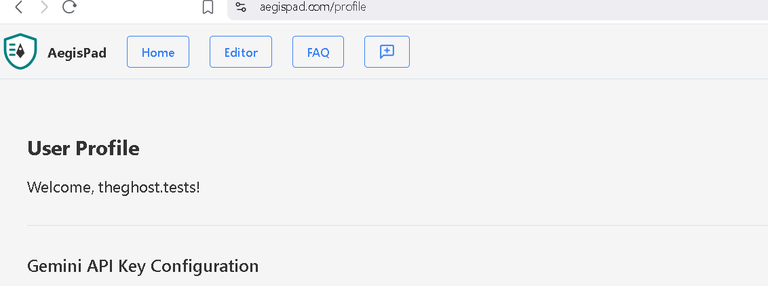
Paso 3: Registrar tu Clave API de Gemini en AegisPad
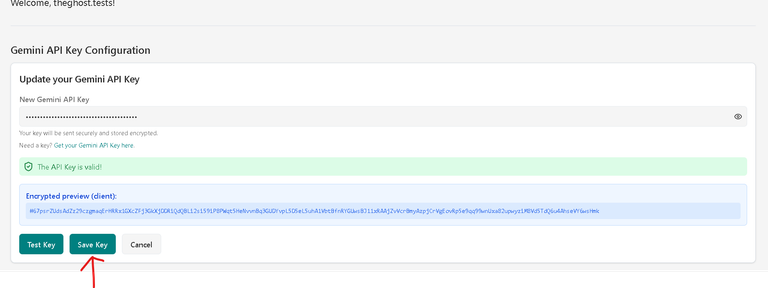
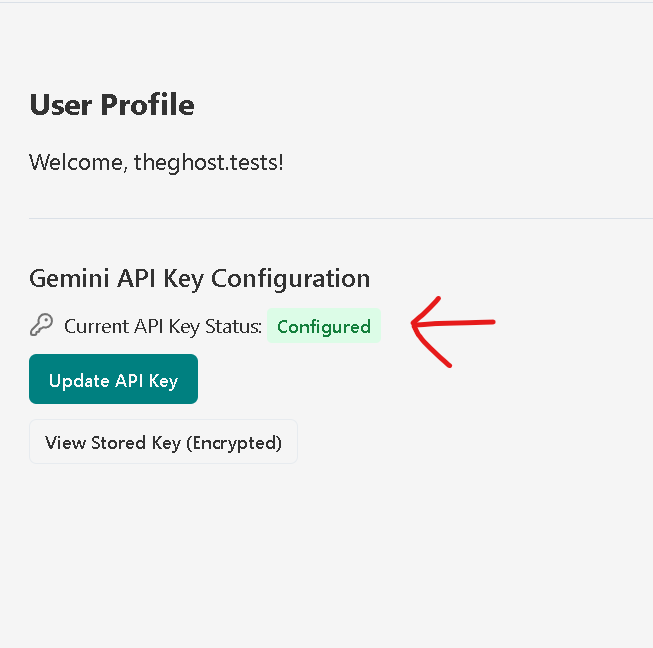
Una vez que tengas tu clave API de Gemini, es hora de configurarla en AegisPad.
- Dirígete a tu Perfil dentro de AegisPad (generalmente accesible desde el menú de usuario una vez que has iniciado sesión).
- Busca la sección "Configuración de la Clave API de Gemini" o similar.
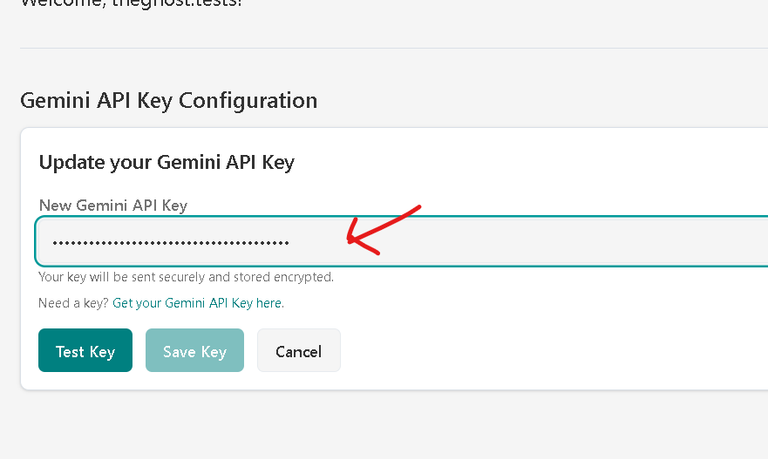
- Verás un campo para ingresar tu clave. Pega la clave que copiaste de Google AI Studio.
Tu Seguridad es Nuestra Prioridad:
Cuando guardas tu clave API de Gemini en AegisPad:
- Encriptación Segura: La clave se encripta utilizando las credenciales de tu cuenta HIVE (específicamente, tu clave de posteo o "posting key") a través de Hive Keychain.
- Almacenamiento Protegido: La clave encriptada se almacena de forma segura, vinculada a tu perfil. AegisPad está diseñado para que tu clave original (desencriptada) nunca sea expuesta innecesariamente. Solo se desencripta en el momento preciso en que se necesita para realizar una solicitud a la API de Gemini, y esta operación se maneja con el máximo cuidado.
- Haz clic en "Guardar Clave" o "Guardar y Probar". AegisPad verificará que la clave sea válida.
¡Con tu clave API configurada, estás listo para usar las funciones de IA! Y recuerda, la cuota gratuita de Gemini te da un amplio margen para experimentar y trabajar en tus contenidos.
Luego de tener tu apikey registrada en aegispad ya puedes empezar a crear contenido en markdown o traer el contenido que deseas revisar y/o traducir y publicar.
Tendras a dispocision un editor y su vista previa y he dispuesto la app por pasos. Algunos son opcionales.
Paso 4: Revisar tu Contenido con IA
¿Tienes un borrador de artículo y quieres pulirlo? La función de revisión con IA de AegisPad te puede ayudar a mejorar la gramática, el estilo, la claridad y la fluidez de tu texto.
- Ve a la página del Editor en AegisPad.
- Pega tu artículo escrito en formato Markdown en el área de edición.
- Busca el botón o la opción "Revisar Artículo con IA".
- Al activarlo, la IA analizará tu texto y te proporcionará una versión mejorada, intentando mantener el formato Markdown original.
Esta herramienta es ideal para darle un toque profesional a tus escritos antes de publicarlos.
Paso 5: Traducir tu Artículo
¿Quieres que tu contenido llegue a una audiencia más amplia? AegisPad te permite traducir tus artículos a diferentes idiomas de forma rápida y sencilla.
- Con tu artículo cargado en el Editor.
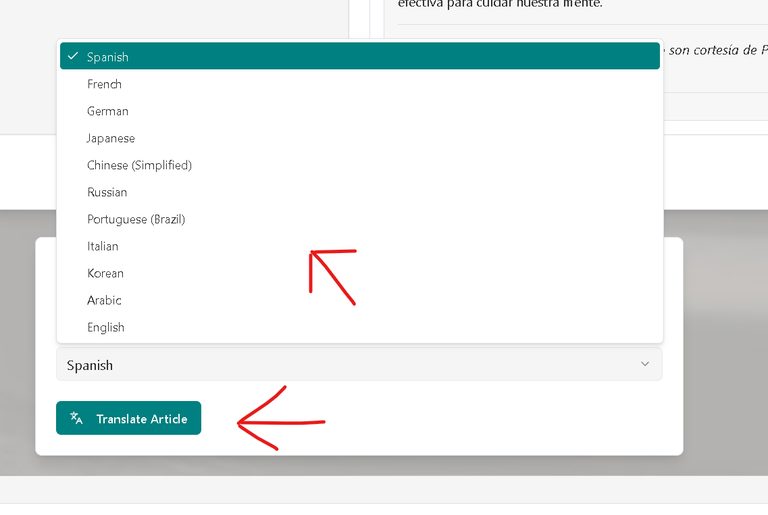
- Encuentra la sección o el botón para "Traducir Artículo".
- Se te pedirá que selecciones el idioma de destino al que deseas traducir tu texto.
- Una vez seleccionado, la IA procesará la traducción, esforzándose por mantener la estructura y el formato Markdown de tu artículo original.
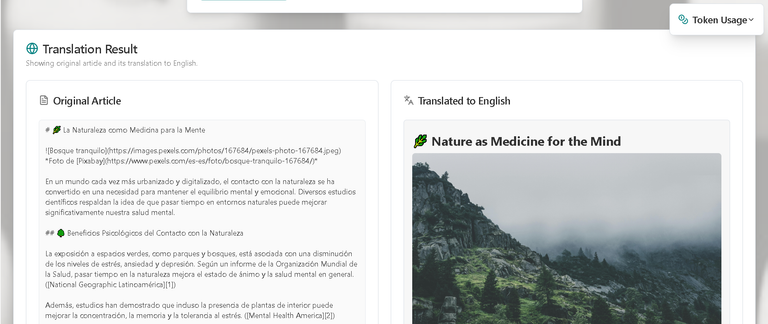
- Generalmente, verás una comparación lado a lado del texto original y el traducido.
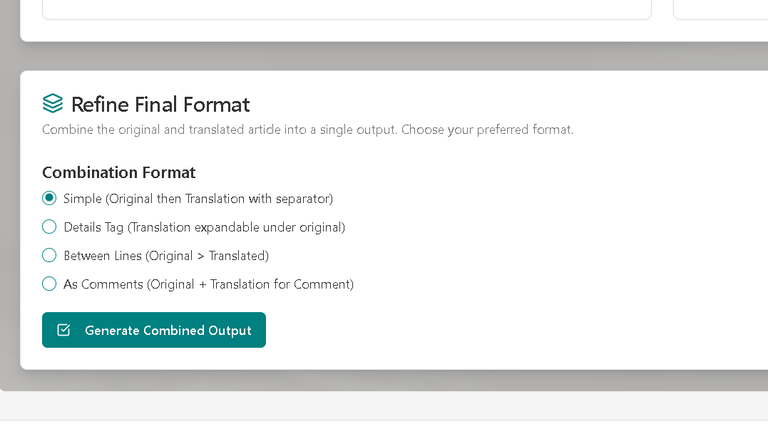
Super Paso: Combinar original y traducciones
Como es sabido siempre queremos hacer la experiencia de lectura lo mas amena posible es por eso que luego de traducir esta la seccion de combinar el contenido. Aca podras elegir por ejemplo:
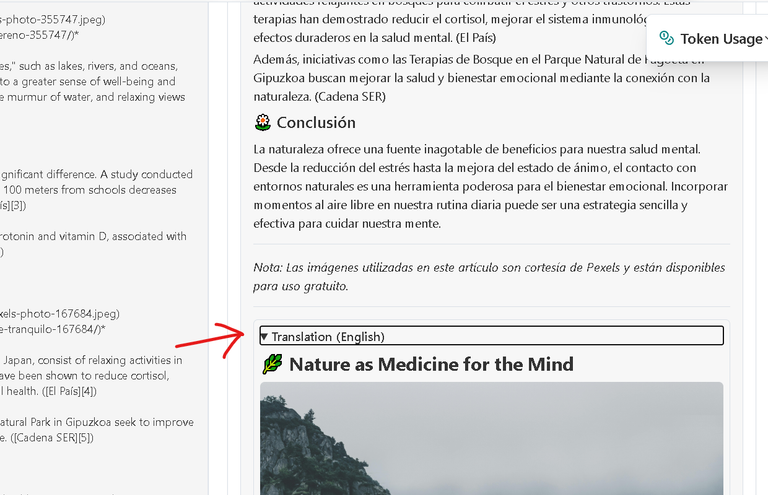
- original arriba y traduccion debajo
- original primero y traduccion dentro de un bloque expandible
- y muchas mas que iremos agregando segun la adopcion de la app.
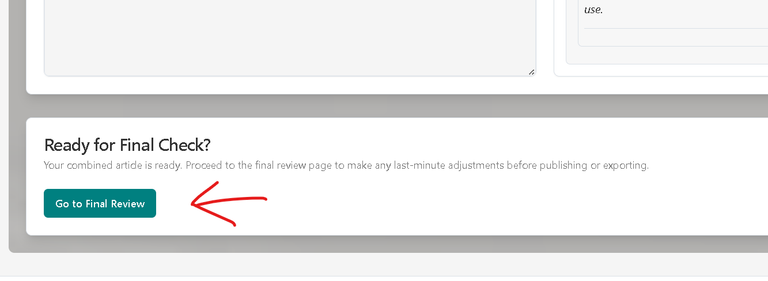
Paso 6: Preparar y Publicar en HIVE
Una vez que tu artículo esté revisado, traducido (si aplica) y listo para ver la luz, es momento de prepararlo para HIVE.
Desde el Editor, si has realizado traducciones o revisiones, usualmente habrá una opción para proceder a una "Revisión Final". Haz clic en ella.
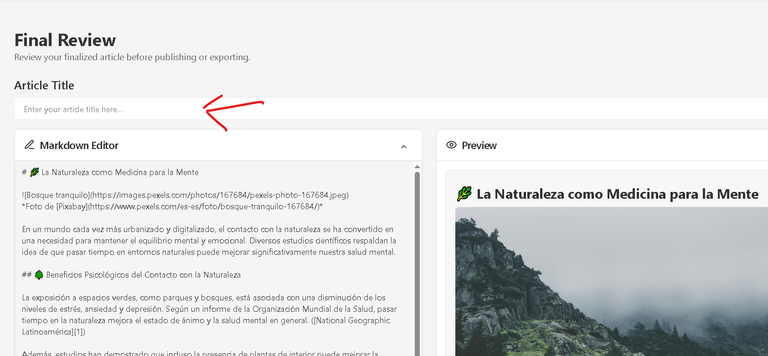
En la página de Revisión Final:
- Título del Artículo: Verás un campo prominente en la parte superior para ingresar o editar el título de tu post. Asegúrate de que sea atractivo y descriptivo.
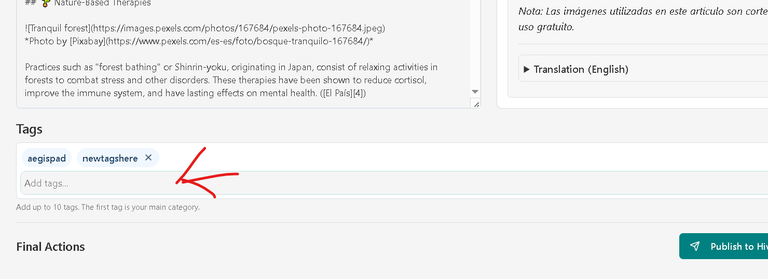
- Etiquetas (Tags): Justo debajo o cerca del título, encontrarás el componente para añadir etiquetas.
- Escribe tus etiquetas una por una. Puedes separarlas con Enter, coma o espacio.
- La primera etiqueta que añadas será considerada tu categoría principal en HIVE.
- Puedes añadir hasta 10 etiquetas (aunque el límite de HIVE es de 10,
aegispadse añade por defecto, así que puedes añadir 9 más). Elige etiquetas relevantes para tu contenido. - La etiqueta
aegispadse añade automáticamente para ayudar a identificar el contenido creado con nuestra app.
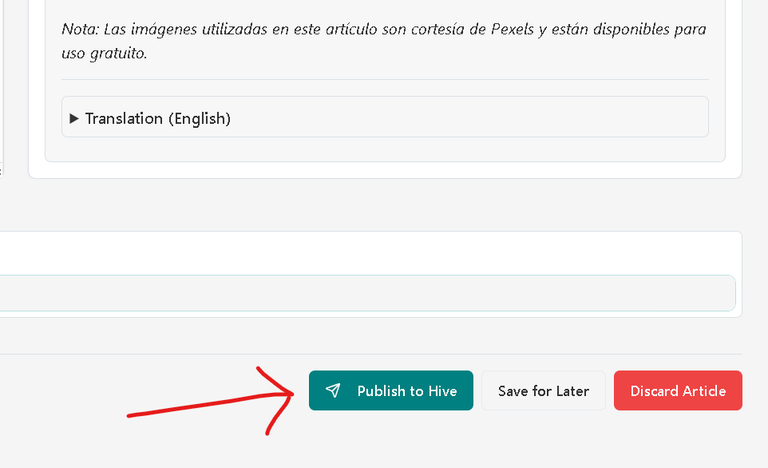
- Contenido del Artículo: Revisa por última vez tu artículo en el editor Markdown y su vista previa.
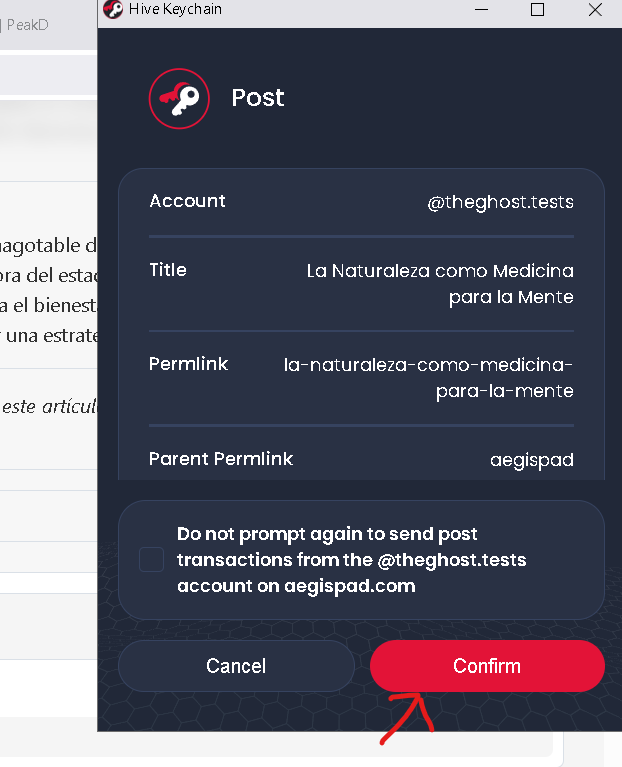
Cuando todo esté perfecto, busca el botón "Publicar en Hive".
Al hacer clic, Hive Keychain se activará nuevamente, esta vez para pedirte que firmes y autorices la transacción de publicación en la blockchain de HIVE.
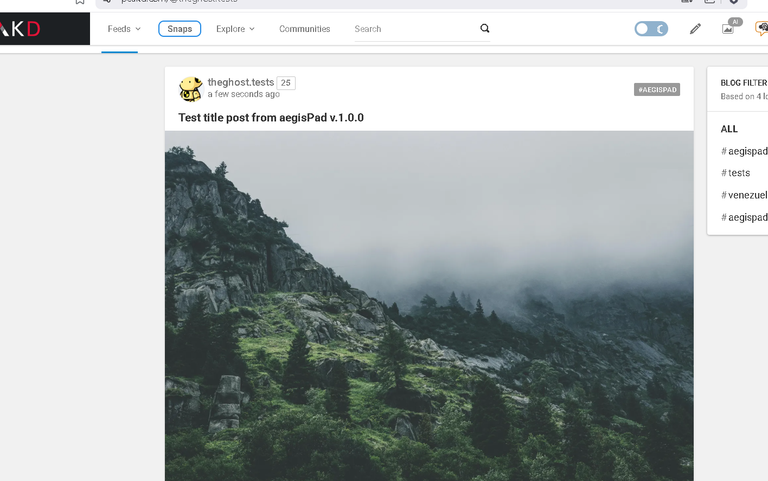
¡Aprueba la transacción y tu artículo será publicado!
Recuerda que APP_NAME (aegispad) y APP_VERSION (1.0.0) se incluirán automáticamente en los metadatos de tu publicación.
¡Y eso es todo! Siguiendo estos pasos, podrás utilizar AegisPad para refinar, traducir y publicar tu contenido en HIVE de manera eficiente y segura.
Te invitamos a explorar todas las funcionalidades y, si tienes alguna sugerencia o encuentras algún detalle, no dudes en usar la opción de "Feedback" en la aplicación. ¡Tu opinión es muy valiosa para nosotros!
Translation (English)
Step-by-Step Guide to Using AegisPad: Your Smart Assistant for HIVE
(html comment removed: IMAGEN: Logo de AegisPad o Pantalla de Bienvenida Atractiva )
Step 1: Logging into AegisPad
To begin and secure your configurations, you will need to log in with your HIVE account. AegisPad uses Hive Keychain, the secure and recommended browser extension for interacting with the HIVE blockchain.
Click the "Login" button, usually found in the upper right part of the application.
You will be asked to enter your HIVE username.
Hive Keychain will activate and ask for authorization for AegisPad to verify your identity. Approve the request and you're done!
With this, AegisPad will be able to securely associate your Gemini API key (which we will configure later) to your account.
Step 2: Obtaining your Gemini API Key
AegisPad's smart functions, such as text review and translation, are powered by Google's powerful AI, Gemini. To use them, you will need your own Gemini API key.
Good news! Google offers a generous free tier for the Gemini API, which includes a large number of tokens (the "currency" used to process your AI requests) each month. This is more than enough to review and translate many articles!
Follow these steps to obtain your key:
Visit the Google AI Studio website.
Log in with your Google account.
Look for the "Get API key" or "Create API key" option.
- Create a new API key. Make sure to copy and save it in a safe place temporarily, as you will need it in the next step.
Step 3: Register your Gemini API Key in AegisPad
Once you have your Gemini API key, it's time to configure it in AegisPad.
Go to your Profile within AegisPad (usually accessible from the user menu once you have logged in).
Look for the section "Gemini API Key Settings" or similar.
You will see a field to enter your key. Paste the key you copied from Google AI Studio.
Your Security is Our Priority:
When you save your Gemini API key in AegisPad:
Secure Encryption: The key is encrypted using your HIVE account credentials (specifically, your posting key) through Hive Keychain.
Protected Storage: The encrypted key is stored securely, linked to your profile. AegisPad is designed so that your original (decrypted) key is never unnecessarily exposed. It is only decrypted at the precise moment it is needed to make a request to the Gemini API, and this operation is handled with the utmost care.
- Click "Save Key" or "Save and Test". AegisPad will verify that the key is valid.
With your API key configured, you're ready to use the AI features! And remember, the free Gemini quota gives you ample room to experiment and work on your content.
After registering your API key in AegisPad, you can start creating content in markdown or bring the content you want to review and/or translate and publish.
You will have an editor and its preview at your disposal, and I have arranged the app step by step. Some are optional.
Step 4: Review your Content with AI
Do you have a draft article and want to polish it? AegisPad's AI review function can help you improve the grammar, style, clarity, and flow of your text.
Go to the Editor page in AegisPad.
Paste your article written in Markdown format into the editing area.
Look for the "Review Article with AI" button or option.
When activated, the AI will analyze your text and provide you with an improved version, attempting to maintain the original Markdown format.
This tool is ideal for giving your writing a professional touch before publishing.
Step 5: Translate your Article
Do you want your content to reach a wider audience? AegisPad allows you to translate your articles into different languages quickly and easily.
With your article loaded in the Editor.
Find the section or button for "Translate Article".
You will be asked to select the target language to which you wish to translate your text.
Once selected, the AI will process the translation, striving to maintain the structure and Markdown format of your original article.
Generally, you will see a side-by-side comparison of the original and translated text.
Super Step: Combine original and translations
As is known, we always want to make the reading experience as enjoyable as possible, which is why after translating, there is the content combination section. Here you can choose, for example:
original above and translation below
original first and translation within an expandable block
- and many more that we will be adding according to the app's adoption.
Step 6: Prepare and Publish on HIVE
Once your article is reviewed, translated (if applicable) and ready to see the light of day, it's time to prepare it for HIVE.
From the Editor, if you have made translations or revisions, there will usually be an option to proceed to a "Final Review". Click on it.
On the Final Review page:
Article Title: You will see a prominent field at the top to enter or edit the title of your post. Make sure it is attractive and descriptive.
Tags: Just below or near the title, you will find the component to add tags.
Write your tags one by one. You can separate them with Enter, comma or space.
The first tag you add will be considered your main category on HIVE.
You can add up to 10 tags (although the HIVE limit is 10,
aegispadis added by default, so you can add 9 more). Choose tags relevant to your content.The
aegispadtag is automatically added to help identify content created with our app.Article Content: Review your article one last time in the Markdown editor and its preview.
When everything is perfect, look for the "Publish on Hive" button.
When you click, Hive Keychain will activate again, this time to ask you to sign and authorize the publication transaction on the HIVE blockchain.
Approve the transaction and your article will be published!
Remember that APP_NAME (aegispad) and APP_VERSION (1.0.0) will be automatically included in your post's metadata.
And that's all! Following these steps, you can use AegisPad to refine, translate, and publish your content on HIVE efficiently and securely.
We invite you to explore all the features and, if you have any suggestions or find any details, don't hesitate to use the "Feedback" option in the application. Your opinion is very valuable to us!