ENGLISH CONTENT
Hello to all the members of this community and sewing lovers! Once again, I'm here to share a personal project I started out of curiosity and necessity. I had seen the massive sale of neck pillows and wondered if owning one would be useful for the long hours of travel I occasionally undertake. I confess that when I see something made of fabric that I can make, my seamstress self tells me, "Don't buy it ready-made, make it!" And it's very difficult to silence that part of me, especially if the piece doesn't look that complicated.

Very well. One of the reasons I preferred to make my pillow rather than buy it ready-made is because I had complete freedom regarding its design. I'm a fan of a character named Asmodeus (aka "Ozzie") from the YouTube series "Helluva Boss," so I'm trying to make things with that specific character in mind.

For the pillow design, I decided to focus on the character's mane, where her extra heads are located. I thought the ideal solution would be to make the pillow in the same shade as the mane and add those faces as appliqués. After creating it in my design notebook, I was delighted, and my creative side wouldn't let me go until I bought the materials I needed to see my creation completed.

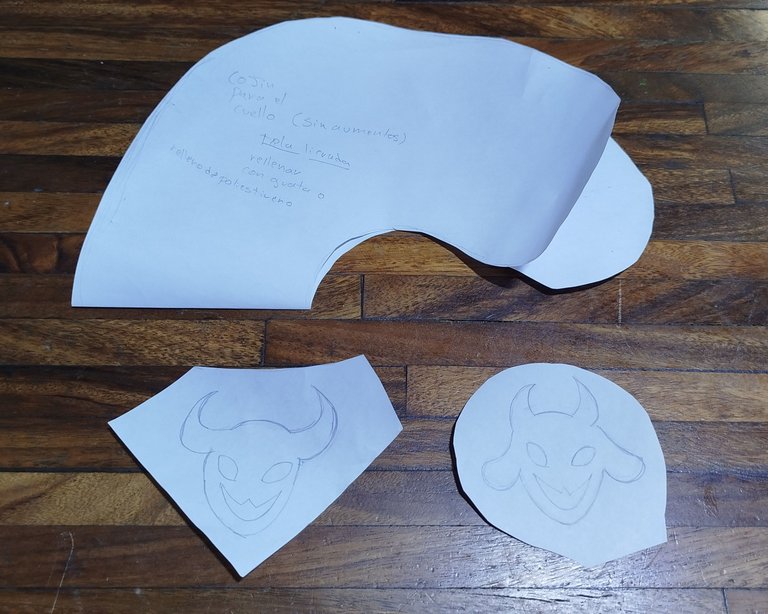
As for the materials, I bought a quarter sheet of turquoise muslin. I think it's better to use a thicker spandex fabric than this, since muslin, while fairly inexpensive, is also somewhat delicate. I didn't need to buy navy blue fabric, as I already had some in my scrap bag. I got the cushion pattern from a cushion I had bought months earlier as a gift, and I made the appliqué designs with the idea of making them easy to embroider. I also got a small piece of POP fabric, which is commonly used for embroidery.
 |  |
|---|
That way, I marked the patterns on the fabric and obtained the pieces for the cushion, as well as the faces. To visualize the details of the eyes and mouth, I marked them using a small piece of carbon paper. As an extra, I added what would become my personal label, which I usually sew onto pieces I make from scratch 😌
 |  |
|---|
When it was time to use the sewing machine, I started by sewing the pieces for the faces. I placed the pieces of POP fabric underneath the cushion fabric, which provides strength and prevents the fabric from puckering when sewn. It's recommended to use light-colored POP fabric or fabric that matches the fabric used. In my case, I used what I had available, although I would have liked to add a piece of white or the same color as the cushion. To attach the pieces, I used a small zigzag stitch around the edges of the figures.
 |  |  |
|---|

Once this was done, I proceeded to make the eyes and mouths, using a zigzag stitch. First, I began outlining the edges and then filled in the spaces, stitching over and over again until the areas were completely covered. And with that, the embroidery was complete. As you can see, it's not that difficult to do simple embroidery, so I recommend practicing if you'd like to learn how to do your own embroidery.
 |  |  |
|---|

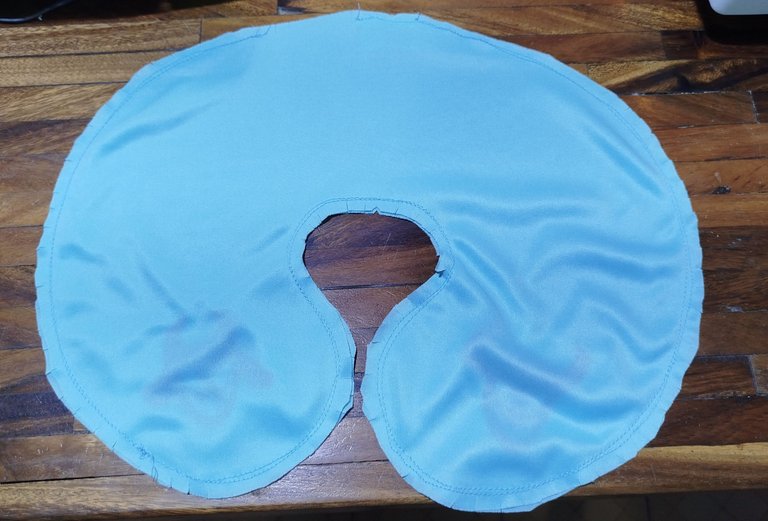
Next, I faced the right sides of the cushion pieces together and sewed a foot's length around the entire edge, leaving a space to insert the stuffing. Since this piece has curves, it's necessary to make some notches in the fabric so it gives when turned over. In the photographs, you can see how the cushion looks both right side up and wrong side up with its respective notches. When you turn the piece over, it's ready to be stuffed.
 |  |  |
|---|
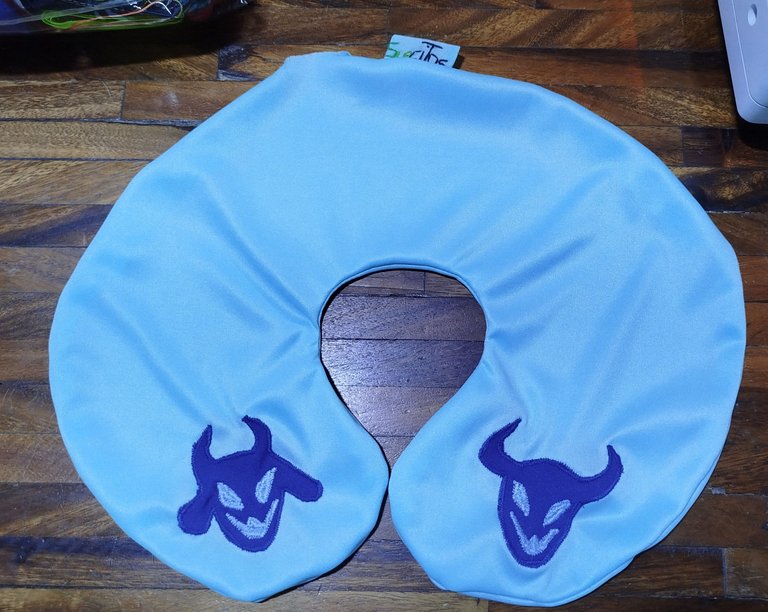
In this step, I used a whole bag of stuffing. I don't know how much it contains, since I bought it at a small store that sold it in bags. I put all the stuffing in the bag into this cushion, although I think adding more would have made it more compact. But as I mentioned before, muslin is a somewhat delicate fabric, and in the unstitched area, it was fraying as I added the stuffing, so I tried to be gentle and not overuse the material's elasticity. Once this was done, I closed the opening with a hand seam, and the cushion was ready.
 |  |
|---|
I have to admit, it turned out exactly as I imagined. I learned that it's better to use a sturdier fabric and more filling, but since it was something for my use, it's not a problem. I'd never used this kind of pillow before, but I confess that now I can't sleep without it because I'm using it to sleep at night. Haha. Before, I would sometimes wake up with a stiff neck or have to move, but now, I sleep peacefully and don't know what's happening to me until the next day.


I'm thinking of making more pillows like these, taking into account what I learned making this one. I've already drawn some designs based on the same series to include in my "catalog." I've already used it on my travels, and it's much more comfortable to endure so many hours on a bus. Perhaps it would be a good idea to offer them on request. What do you think? 😊

✨ Thank you so much for checking out my post. I hope you found it interesting ✨
💚 See you next time! 💚

CONTENIDO EN ESPAÑOL
¡Hola a todos los integrantes esta comunidad y amantes de la costura! Una vez más, vengo a mostrarles un proyecto personal que realicé llevada por la curiosidad y la necesidad, siendo que había visto la venta masiva de almohadas cervicales y me preguntaba si tener una, me serviría para las largas horas de viaje que realizo de vez en cuando. Confieso que cuando veo algo hecho de tela que puedo fabricar, mi parte costurera me dice "No lo compres hecho, hazlo" y es muy difícil acallar esa parte de mí, más si la pieza se ve que no es tan complicada 😆
Muy bien. Uno de los motivos también, por los que preferí hacer mi almohada que comprarla ya hecha, es porque tenía completa libertad en cuanto a su diseño. Soy fanática de un personaje llamado Asmodeus (alias "Ozzie"), de la serie de Youtube "Helluva Boss", así que estoy tratando de hacerme cosas pensadas en ese personaje en específico.
Para el diseño de la cojín, pensé en enfocarme en la melena que tiene el personaje, en donde se encuentran sus cabezas adicionales. Pensé que lo más ideal, era realizar el cojín con la tonalidad de la melena y agregar esos rostros a modo de apliques. Tras elaborarlo en mi cuaderno de diseños, quedé encantada y mi parte creadora no me dejó quieta hasta que compré los materiales que necesitaba para ver mi creación hecha.
En cuanto a los materiales, compré 1/4 de muselina color turquesa. Considero que es mejor utilizar una tela licrada más gruesa que éste, ya que la muselina, al ser bastante económica, es también algo delicada. No tuve necesidad de comprar tela azul marino, ya que de esa sí tenía en mi bolsa de retazos. El patrón del cojín, lo obtuve de un cojín que había comprado meses atrás para obsequiar y los dibujos para los apliques, los hice pensando en que fuesen sencillos a la hora de bordarse. Adicionalmente, conseguí un pedacito de tela POP, la cual se suele utilizar para los bordados.
| |
|---|
De ese modo, marqué los patrones en la tela y obtuve las piezas del cojín, así como de los rostros. Para poder visualizar los detalles de los ojos y la boca, marqué los mismos utilizando un pedacito de papel carbón. Como añadido, agregué lo que sería mi etiqueta personal, la cual suelo coser a piezas que elaboro desde cero 😌
| |
|---|
A la hora de pasar a la máquina de coser, comencé cosiendo primero las piezas correspondientes a los rostros. Colocando debajo de la tela del cojín, los trocitos de telas POP, la cual aporta dureza y evita que la tela se frunza con la costura. Es recomendable utilizar POP de colores claros o acorde a la tela utilizada. En mi caso, yo utilicé lo que tenía a disposición, aunque me hubiera gustado colocarle un trocito blanco o del mismo color del cojín. Con el fin de anexar las piezas, por todo el borde de las figuras, usé una costura pequeña en zigzag.
| | |
|---|
Una vez hecho esto, procedí a realizar los ojos y las bocas, usando la costura en zigzag. Primero comencé delineando los bordes y luego rellené los espacios, pasando la costura una y otra vez, hasta cubrir por completo las zonas. Y de esta forma, estuvieron listos los bordados. Como pueden ver, no es tan difícil hacer bordados y sencillos, por lo que les recomiendo practicar si es de su agrado aprender a hacer sus propios bordados.
| | |
|---|
Luego, enfrenté los derechos de las piezas correspondientes al cojín y cosí a una distancia de pie de máquina por todo el borde, procurando dejar un espacio para introducir el relleno. Como se trata de una pieza con curvas, es necesario hacer unos piquetes en la tela para que la misma, ceda al momento de voltearse. En las fotografías puede apreciarse cómo se ve el cojín tanto del derecho como del revés con sus respectivos piquetes. Al voltear la pieza, estará lista para rellenarse.
| | |
|---|
En éste paso, utilicé una bolsa completa de relleno. No sé cuánto trae, ya que lo compré en una tienda pequeña que lo vendía por bolsitas. A éste cojín, le introduje todo el relleno de la bolsa, aunque considero que metiéndole más, hubiera quedado más prensado, pero como comenté anteriormente, la muselina es una tela algo delicada y en la zona descosida, se estaba deshilachando a medida que iba colocando el relleno, así que traté de hacerlo con delicadeza y no abusar de la elasticidad del material. Una vez hecho esto, cerré la abertura con una costura a mano y el cojín, estuvo listo.
| |
|---|
Debo admitir que quedó justamente como lo había imaginado. Aprendí que es mejor usar una tela más resistente y más relleno, pero como se trataba de algo para mi uso, no hay problema. Nunca había utilizado esta clase de cojín, pero confieso que ahora no puedo dormir sin él, porque lo estoy usando para dormir en las noches jaja Antes, a veces despertaba con torticolis o tenía que moverme, pero ahora, duermo plácidamente y no sé de mí hasta el día siguiente.
Tengo pensando hacer más cojines como estos, tomando en cuenta lo que aprendí elaborando éste. Ya dibujé algunos diseños basados en la misma serie para tenerlo en mi "catálogo". Ya lo he usado en mis viajes y es mucho más cómodo soportar tantas horas en un autobús. Tal vez, sería una buena idea para ofrecerlos por encargo ¿Qué opinan? 😊
✨ Muchas gracias por haber visitado mi publicación. Espero que les haya parecido interesante ✨
💚 ¡Hasta una próxima oportunidad! 💚